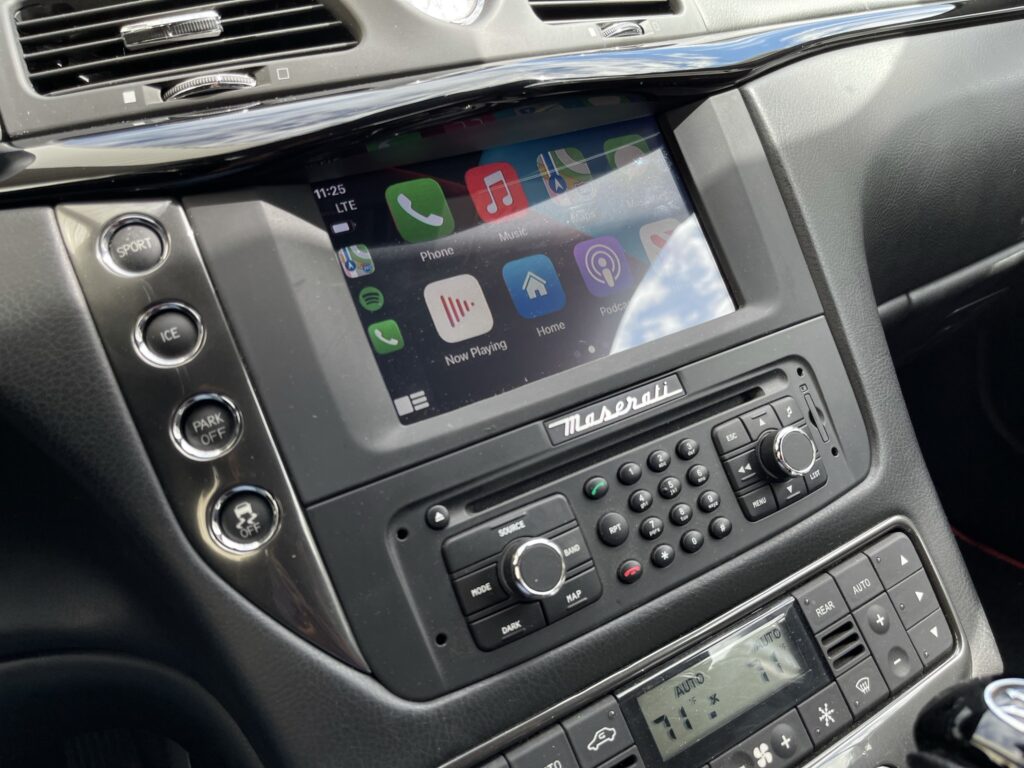
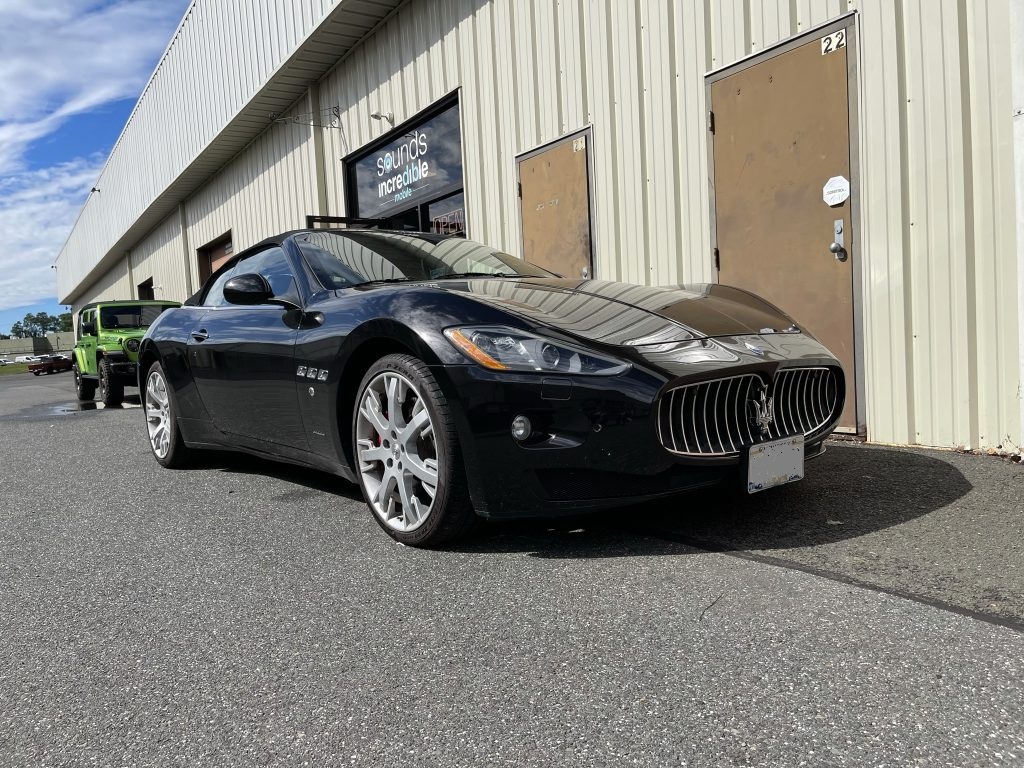
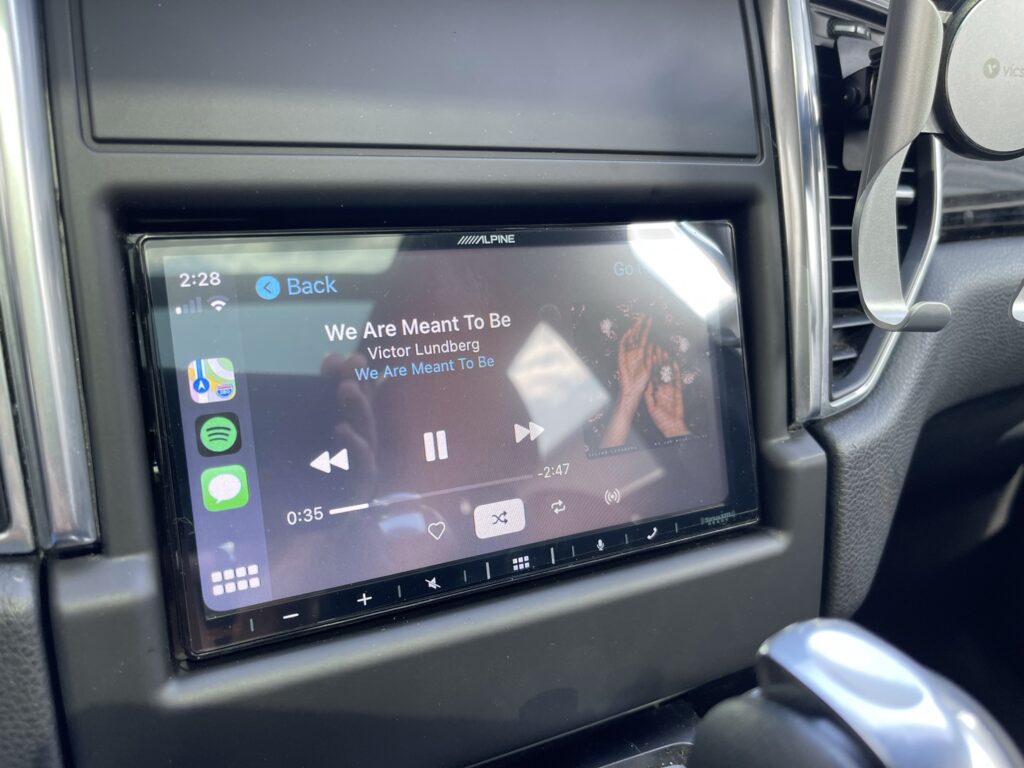
2015 Maserati GranTurismo Sport – Apple CarPlay Installation
This week at the shop: Maserati Apple CarPlay installation. You might assume this Italian exotic would be appointed with all the modern luxuries one could find in any modern day vehicle. Well endowed with its Ferrari designed 454 horsepower V8, yet lacking in the standard features we’ve all grown accustomed to. Lest we forget, Apple CarPlay, reverse cameras and front park assists cameras were not standard features in 2015. For a low volume auto manufacturer like Maserati, it can take years to add such modern amenities to the production line. Although Apple CarPlay made its debut in 2014, Maserati didn’t start incorporating the feature into the GranTurismo model until 2018.
Maserati GranTurismo Apple CarPlay Added
Understandably, the client really enjoyed this vehicle, but desired a way to update the technology to make the ride even more enjoyable. So he sought us out to add Apple CarPlay to his 2015 Maserati GranTurismo Sport.
Adding Apple CarPlay is a great way to breathe new life into any used vehicle. With the new car shortage, this is becoming an increasingly more common upgrade request.
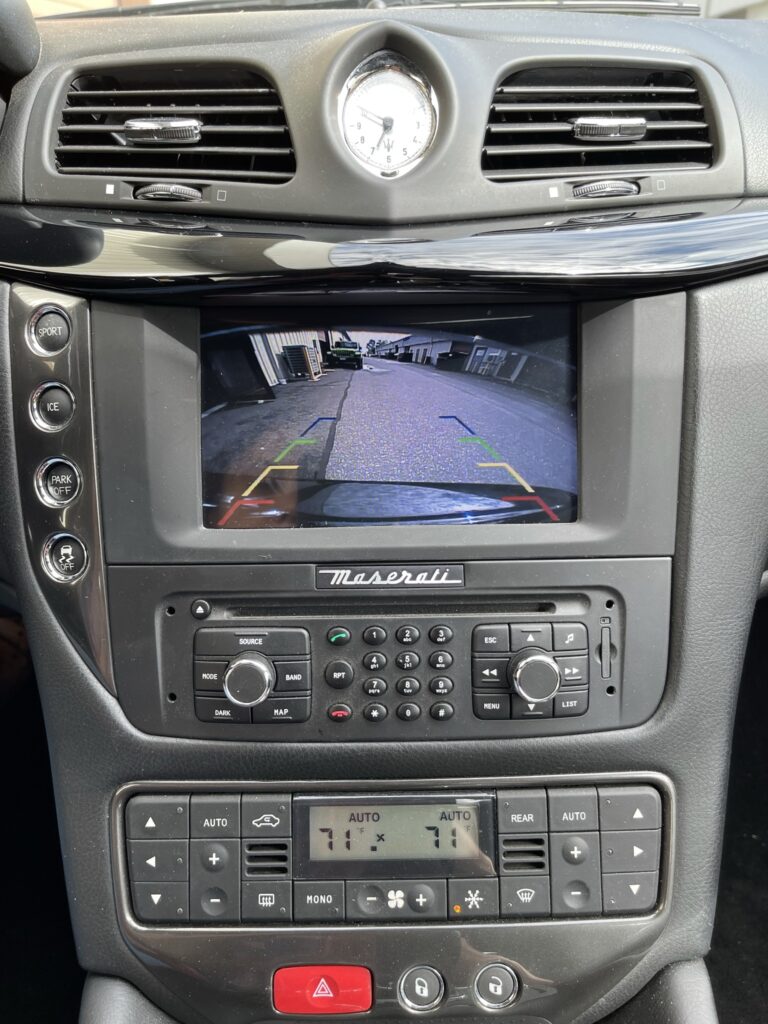
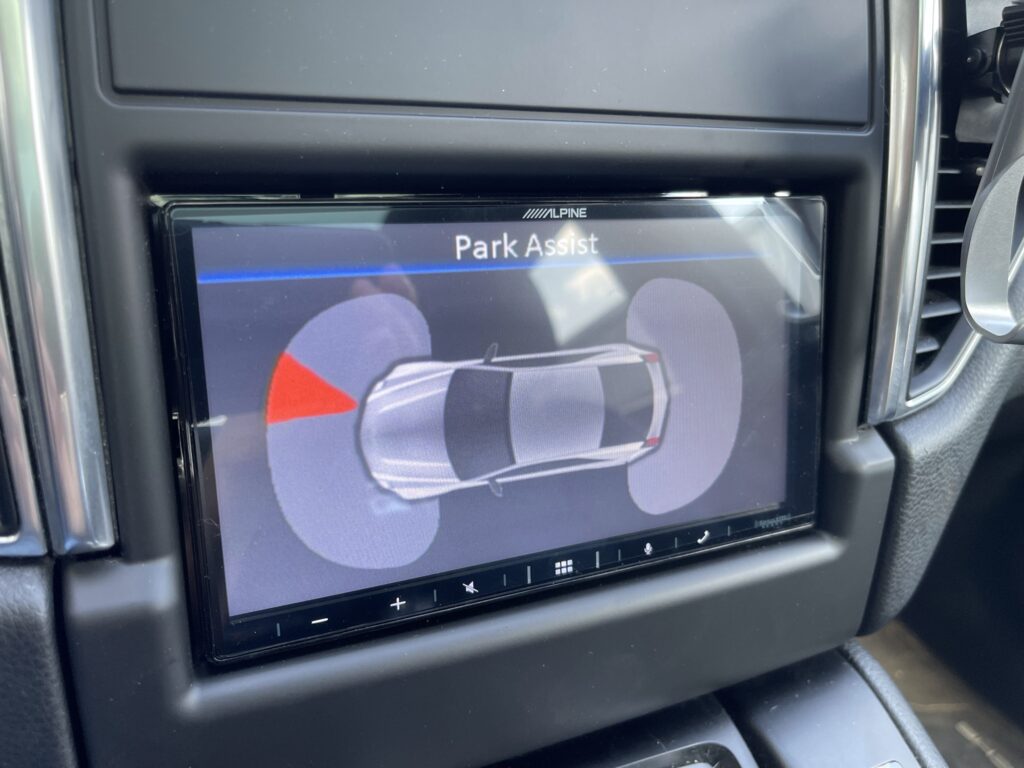
Reverse Camera and Front Park Camera
In addition to updating this vehicle’s in dash technology, we also installed a much needed reverse camera and front park assist camera. Convertibles are almost always tough for rear visibility when the top is up and this vehicle is no exception.
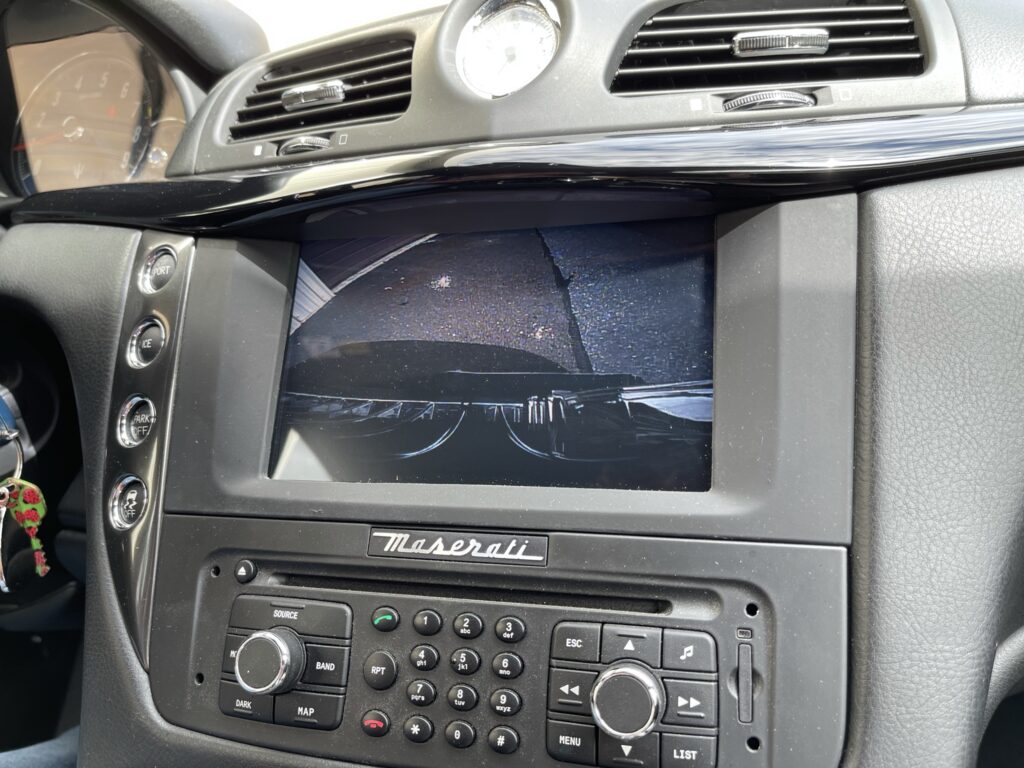
Maserati GranTurismo Reverse Camera Installation
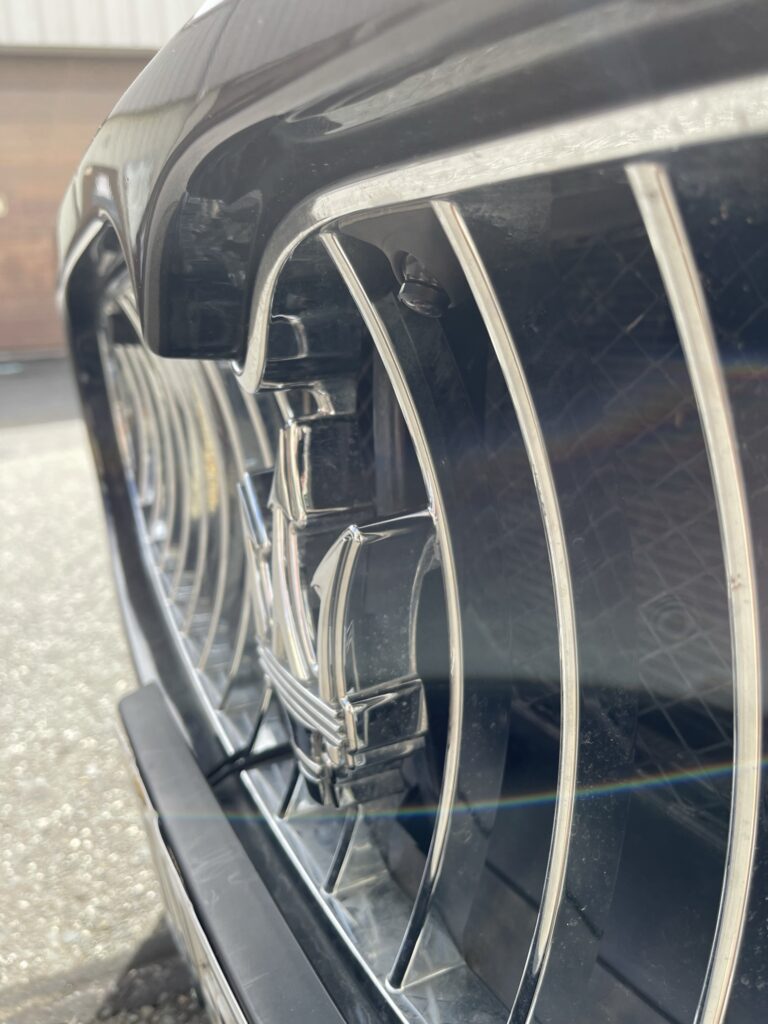
Exotic sports cars need help in the front end too. When you combine such a low stance with that signature proud and prominent Maserati front lip, it’s no wonder the client requested a front park assist camera. Drivers of the Maserati GranTurismo have to be extremely careful not to scrap the underside of their bumper just turning into a driveway.
Front Camera Installation Maserati GranTurismo Sport
Maserati Apple CarPlay – Parts Used
In order to upgrade this Maserati to Apple CarPlay, we needed a few parts. The main piece of hardware we used to accomplish this is from Naviks. This company specializes in these types of interfaces along with products for adding HDMI, reverse cameras and front cameras to various years, makes and models.
Naviks Interface – Maserati GranTurismo
Naviks is an American based company that proudly manufactures 70% of their products in Brooklyn, NY. I tip my hat off to them. Not only is it incredibly difficult to manufacture any kind of electronics in the USA these days, but maintaining any kind of small business in Brooklyn right now is – how do I say it – an extremely tall order.
Maserati Apple CarPlay Installed
Not only do they produce reliable and desirable products, they have great customer service – both email and phone support. This is really important to me as a shop owner. No one has the time – client or technician alike – to sit around and wait on hold or hope you get an email reply back when you’re in the middle of an installation with a car apart.
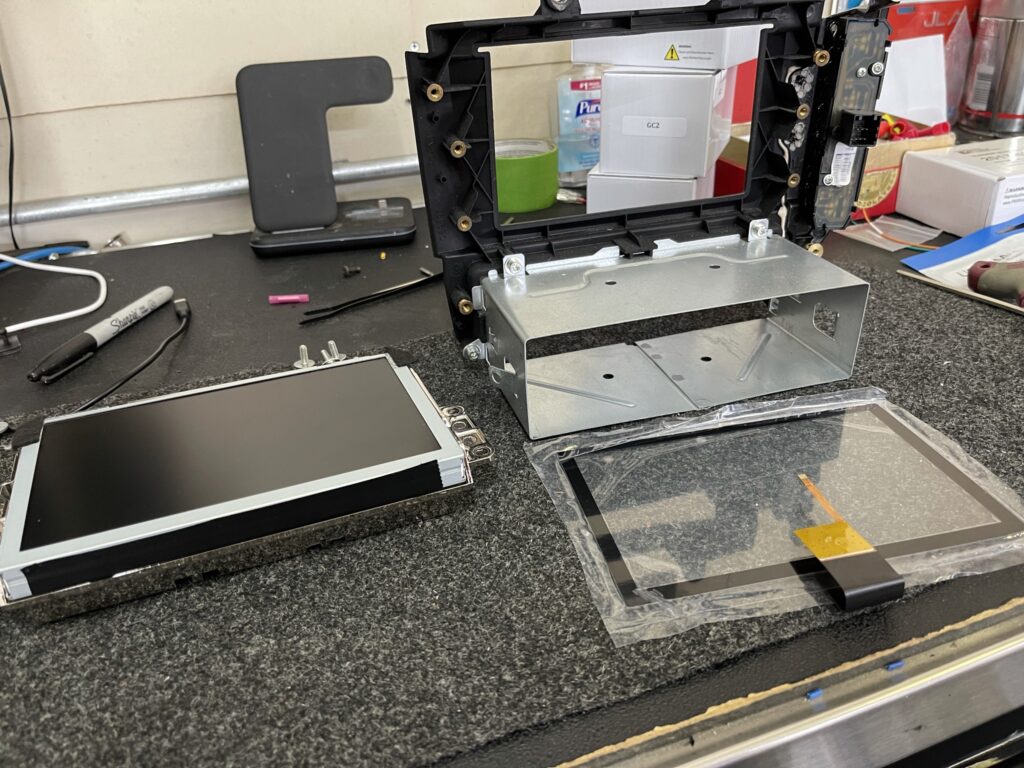
New Touch Screen Overlay for Apple CarPlay – 2015 Maserati GranTurismo
Their kit consists of a couple modules plus a new touch screen overlay for the factory radio. This installation is not for the faint of heart. There is quite a bit that needs to be disassembled including the factory radio display. This install is for seasoned pros or the most fastidious and patient do-it-yourselfer.
Maserati Apple CarPlay – How it Works
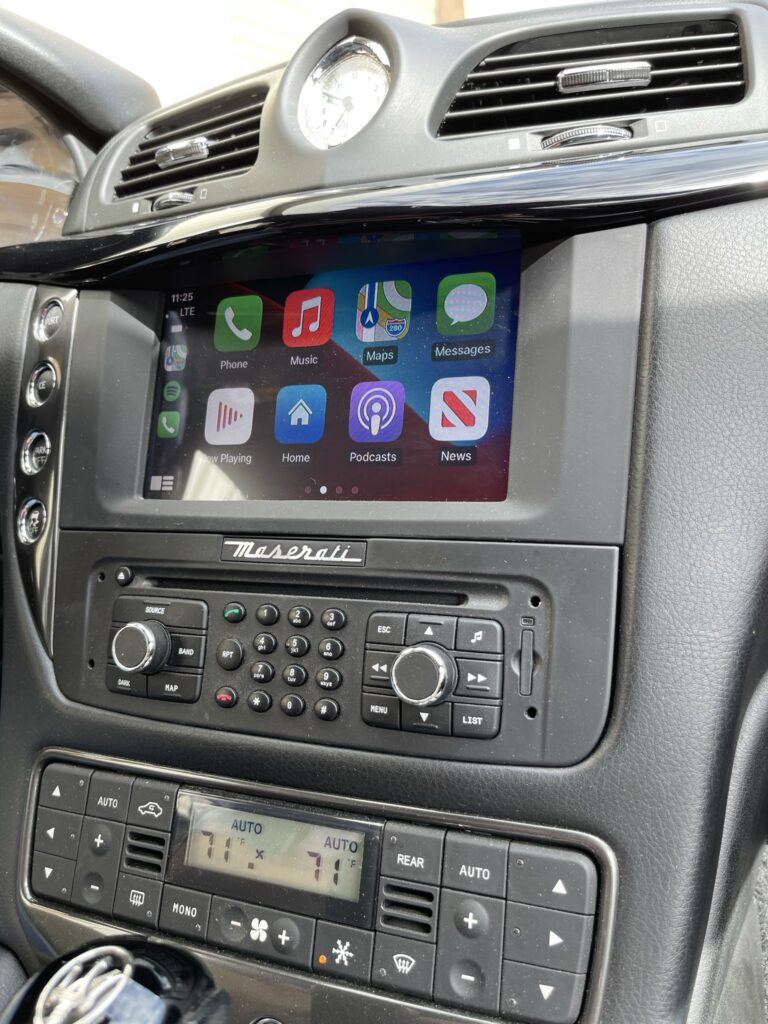
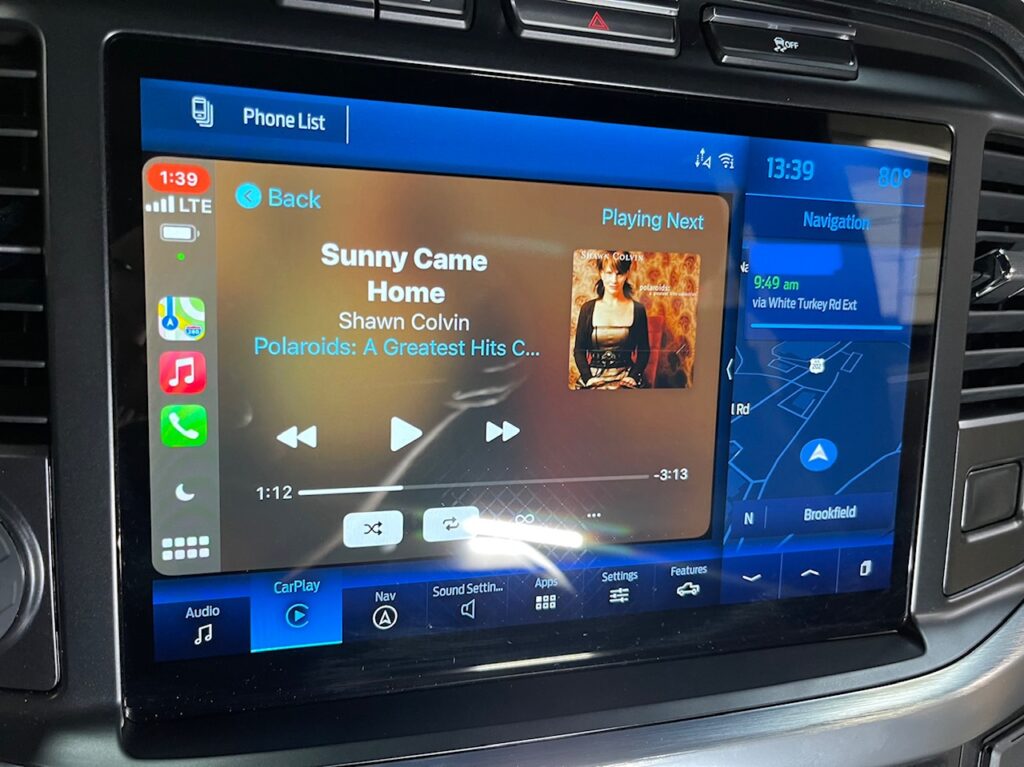
The way this interface works is quite seamless. Like most Apple CarPlay add-on kits, you have to select the factory radio’s AUX input as your source. Once you are on the AUX input, you simply press and hold the telephone button on the steering wheel. That activates the factory screen to switch over to the new Apple CarPlay interface. The connection is wireless with optional charging.
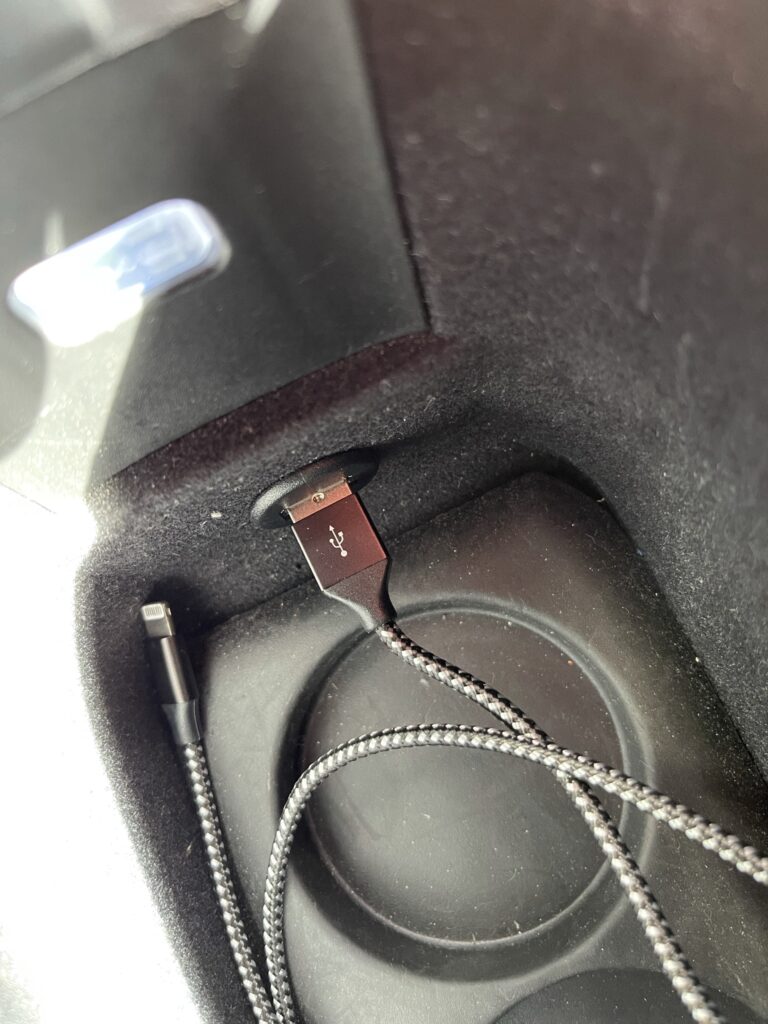
USB flush mounted Maserati Apple CarPlay Installation
The reverse camera is like most reverse cameras – it’s activated as soon as the vehicle is put into reverse. The front camera similarly is activated as soon as you shift from reverse to drive.
Maserati Reverse Camera Installed
There is also a way to activate the front camera on the fly. Simply press and hold the button again to switch the front camera on. To exit Apple CarPlay and select another factory source like AM/FM radio? Simply press and hold that phone button again.
Maserati Front Camera Installation
Adding Apple CarPlay to your vehicle is a great way to enhance your driving experience without the expense of trading up for a newer vehicle. The technology does have its limitations.
Limitations
You do have to be on the AUX input source to use any of the features of CarPlay. Audio for notifications, phone calls and GPS navigation directions are only available when you are actively using the CarPlay input. Additionally, unlike a factory CarPlay set up, there is just one volume control for music, text message notifications, phone calls and GPS directions. This means you will find yourself manually adjusting volume between calls to music to compensate.
To learn more about adding Apple CarPlay to your vehicle, contact our shop or find a local Naviks dealer in your area.
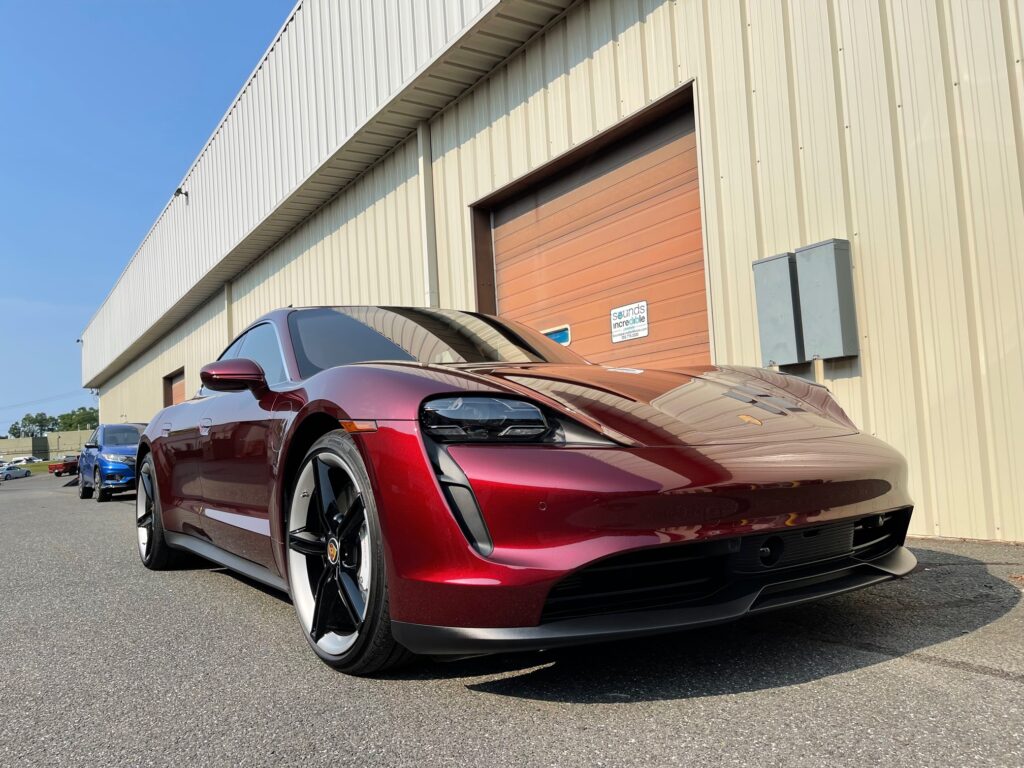
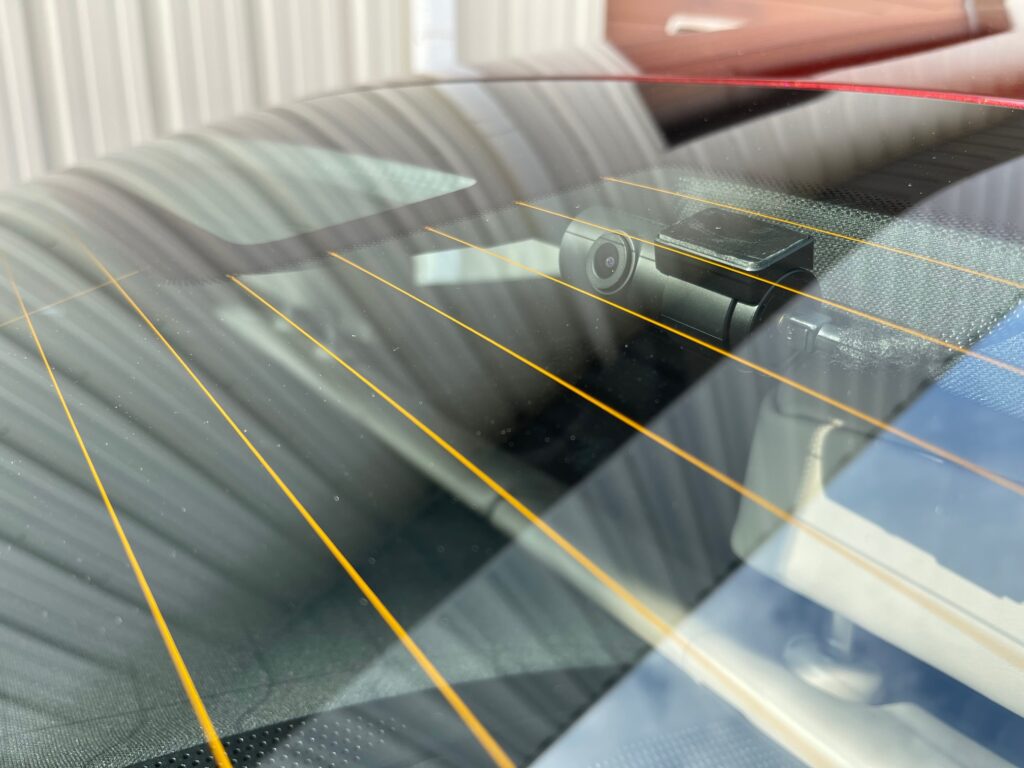
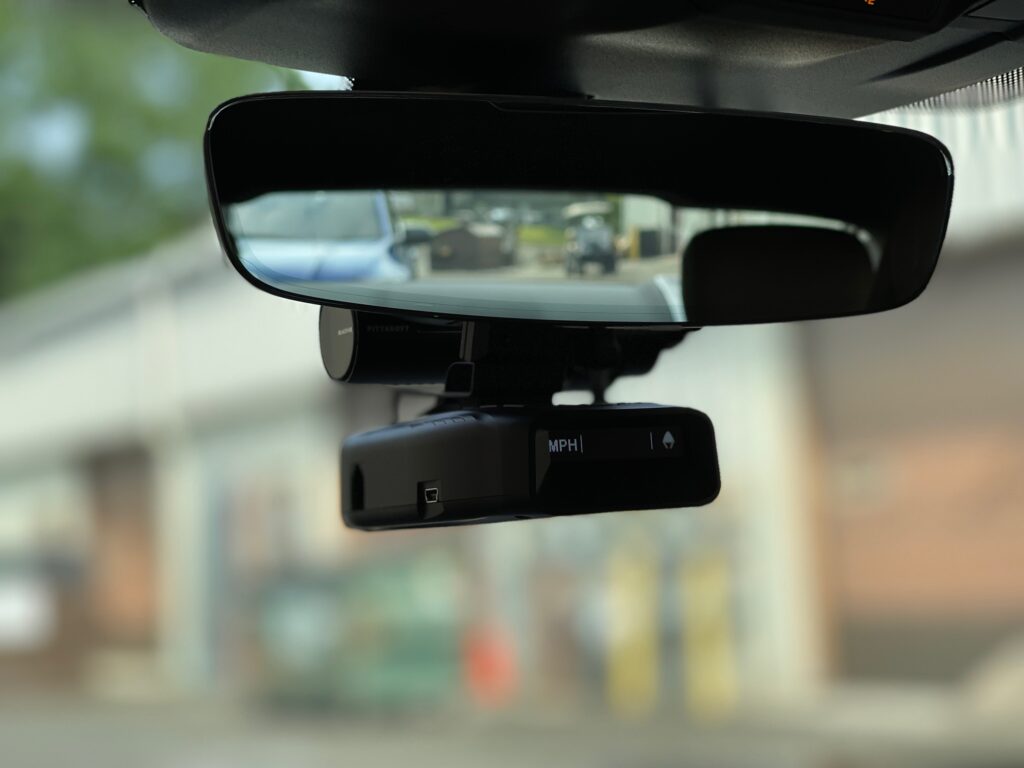
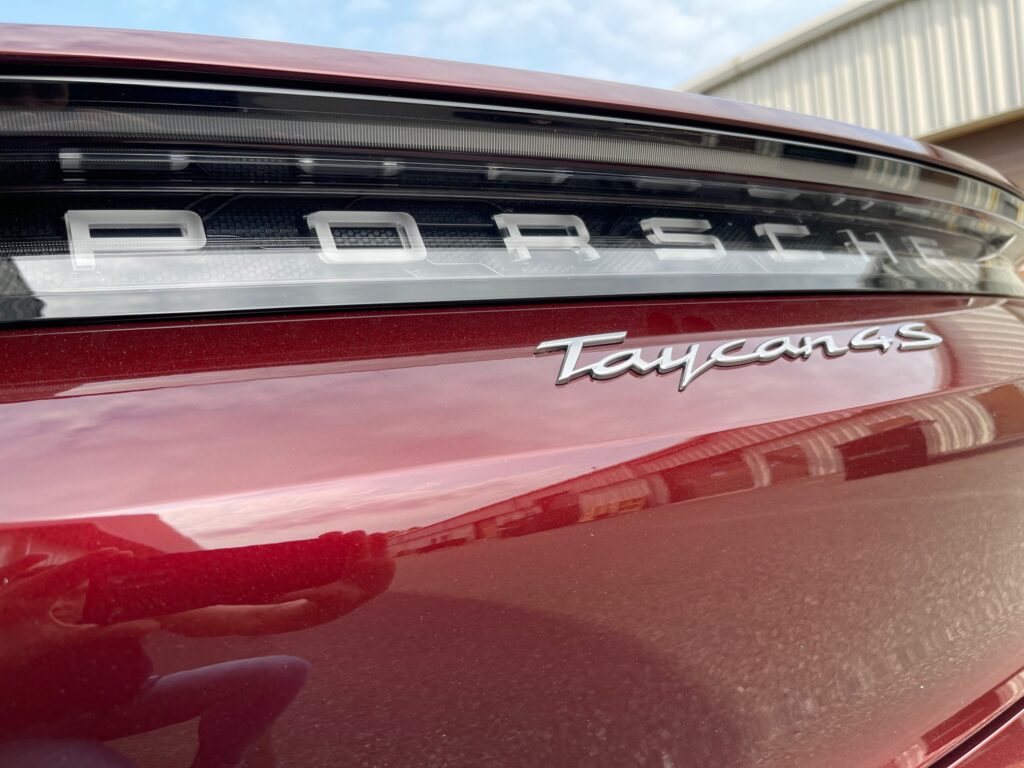
Our crew tackled a 2021 Porsche Taycan radar detector installation plus a front and rear dash camera.
2021 Porsche Taycan 4s
The Porsche Taycan 4s is a fast car. A very fast car. Like scary fast as in 0-60 in 3.8 seconds with an impressive 472 lb-ft torque. It’s no surprise the owner of this vehicle wanted to invest in a radar detector.
Unlike some other electric vehicles on the market, the Porsche Taycan does not come equipped with sentry mode or any type of camera surveillance set up. Thankfully, it’s easy enough to add a dash camera system aftermarket.
Gear Used
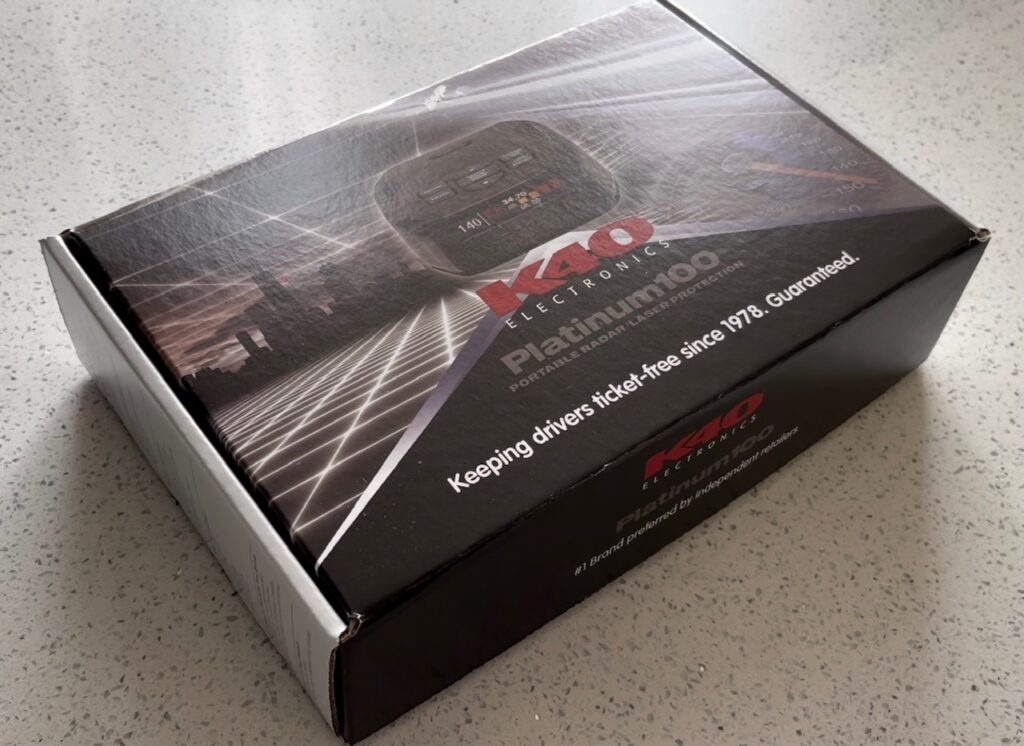
For this installation we used the K40 Platinum 100dash mounted radar detector along with a BlendMount. As much as I would have loved to install laser shifters in this vehicle, that was not on the agenda. This Porsche Taycan 4s is not the client’s daily driver so they didn’t see the immediate need for it.
K40 Platinum 100 Radar Detector
Although the K40 Platinum 100 is windshield mounted style detector, it’s completely expandable. Out of the box it will detect radar and laser – although with laser it may be too late. But if the client’s driving situation ever changes, they can always have us add the laser shifters later on.
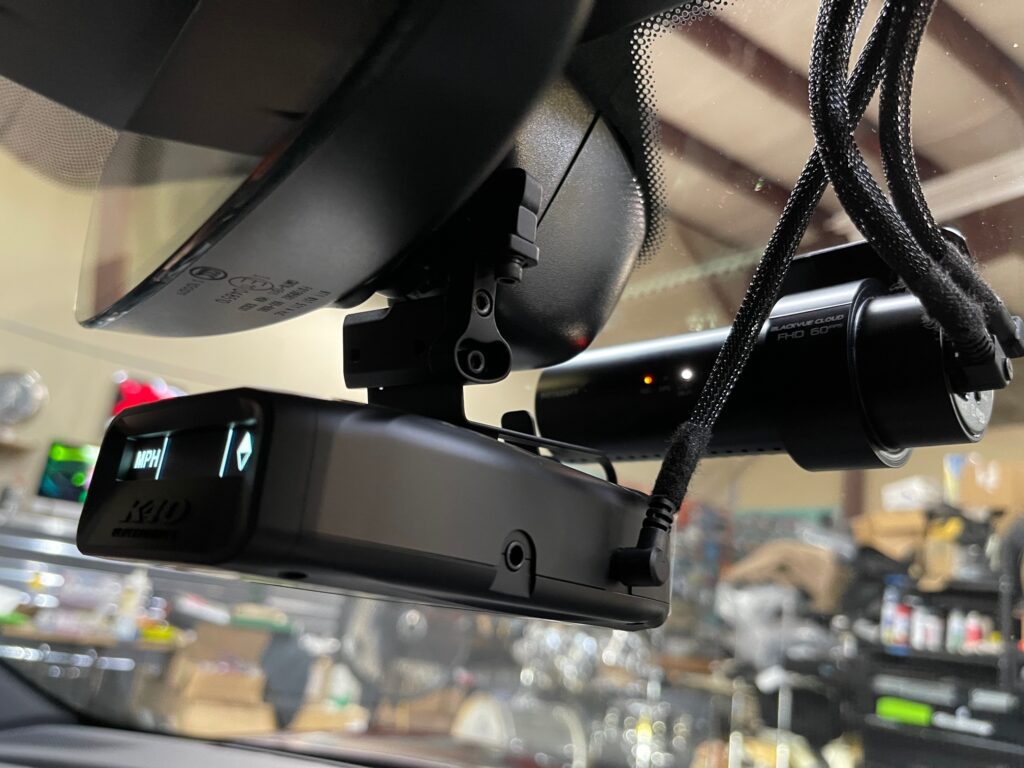
Porsche Taycan 4s Radar Detector with BlendMount
Rather than use the standard included windshield mount, we opted to use a BlendMount. This bracket helps us provide a clean installation plus it frees up some of the real estate on the windshield for the BlackVue dash cam.
Porsche Taycan Dash Camera Installation
The dash camera used for this Porsche Taycan is the BlackVue DR750X-2CH Plus with 64 gig SD card. It features a front and rear HD camera with optional park mode functionality.
Dash Camera Settings and Park Mode Functionality
Whenever I have a client interested in a dash cam with park mode functionality, I encourage them to use a separate battery pack for consistent park mode recording. This is especially true for newer vehicles with proximity keys. For park mode to work consistently – where the camera wakes up and starts recording if it detects motion or impact – the camera needs to see 12.5 volts or higher.
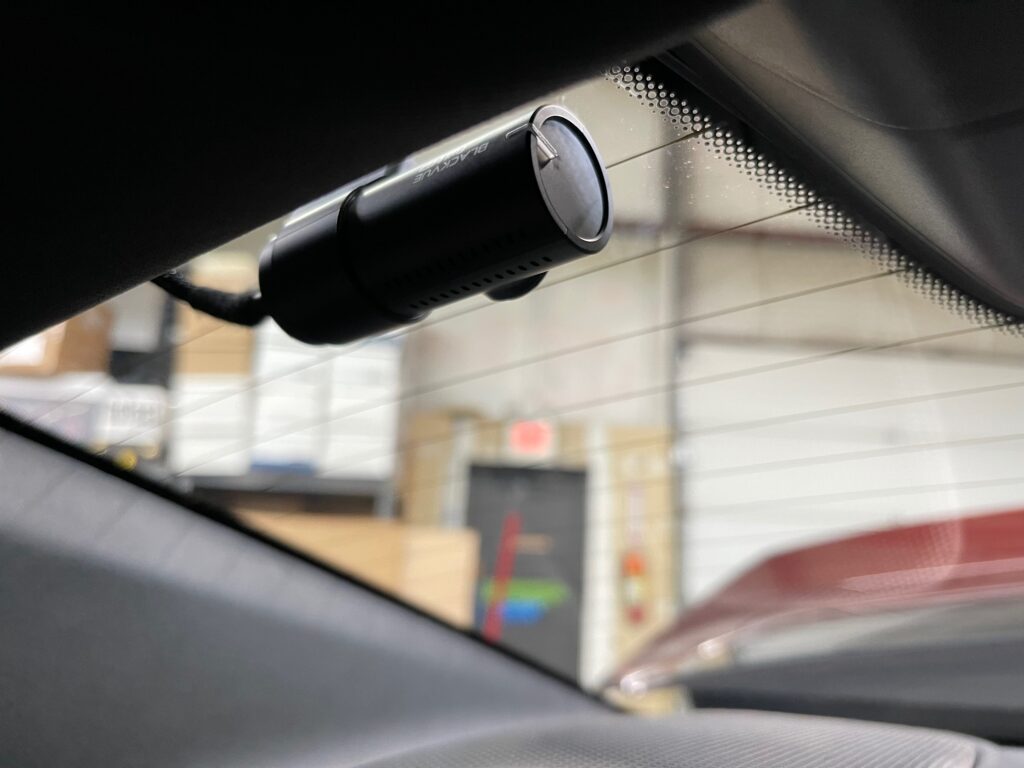
Porsche Taycan Dash Camera Install – Rear Window
In many newer vehicles we see that there can be wild voltage fluctuations simply when locking your car and walking away. The courtesy headlights may come on momentarily dropping voltage below 12 volts only to come right back up as soon as the headlights turn off. This isn’t the case for every vehicle.
Porsche Taycan BlackVue Dash Cam Settings
Our Taycan 4s client was initially more focused on recording while driving vs while the car was parked. Most of the time it would be parked at a safe location so he opted out of the battery pack option. As luck would have it, right before the installation appointment there was an incident that piqued his interest in park mode.
K40 Platinum 100 Radar Detector with Dash Camera – 2021 Porsche Taycan
After attending a Porsche meet, a group of club members went into a restaurant to dine. When they came back out they were horrified to see someone had backed into a member’s brand new Porsche and taken off. After this experience, park mode became a feature he was interested in after all. Since it will be used only periodically, I showed the client how to turn park mode on and off in the app.
12 Volt Accessories for Electric Vehicles
Although this is an electric vehicle, it still has a 12 volt battery and electronic system. This is how we can add aftermarket accessories such as a radar detector or dash camera to an electric vehicle like the Taycan. Skilled technicians like those at our shop use a multimeter and probe to investigate, test and find switched ignition power source.
2021 Porsche Taycan 4S
With the installation complete, the client can drive with a little more piece of mind. If you’re interested in a radar detector or dash camera for your Porsche Taycan, contact our shop today for more information.
This week in the shop – 2016 Porsche Macan Apple CarPlay installation.
Recently a client reached out to us about a problematic radio in his Porsche Macan. He was experiencing issues with the factory PCM Bose radio. It was pretty much shot – continuously rebooting and shutting down. After being quoted an astronomical price from the dealer, he reached out to us to explore his options. We could have sent the PCM radio out to be repaired. However, he would still be stuck with dated technology. In this case the client preferred the option of fitting his Porsche Macan with a new Apple CarPlay/Android Auto radio.
Porsche Macan Apple CarPlay installed – Alpine iLX-W650
The radio in this vehicle is part of the whole operating system in the car. Even basic functions like warning chimes are on this data circuit. If you remove the radio, it’s like removing a computer in a network of computers. When the flow of information is broken features are often be lost. For that reason it’s important to use parts that can retain the flow of CAN information as well as various features on the MOST network.
Porsche Macan Alpine iLX-W650
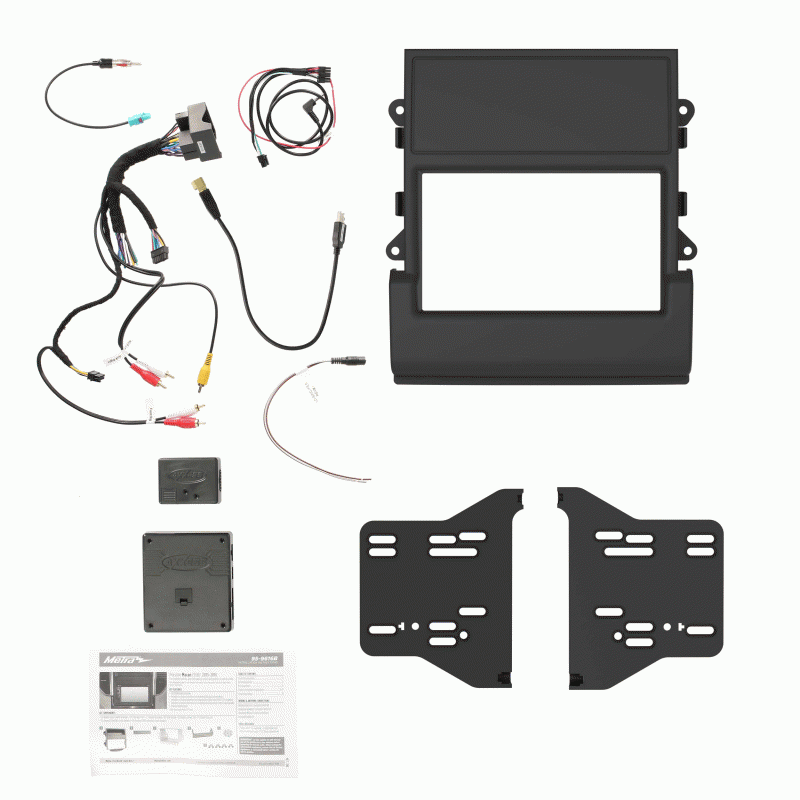
Very specific parts required
In order to install Apple CarPlay in this Porsche Macan, we used the Metra 95-9616B. This installation kit included everything we needed to replace the radio in 2015-2016 Porsche Macan equipped with:
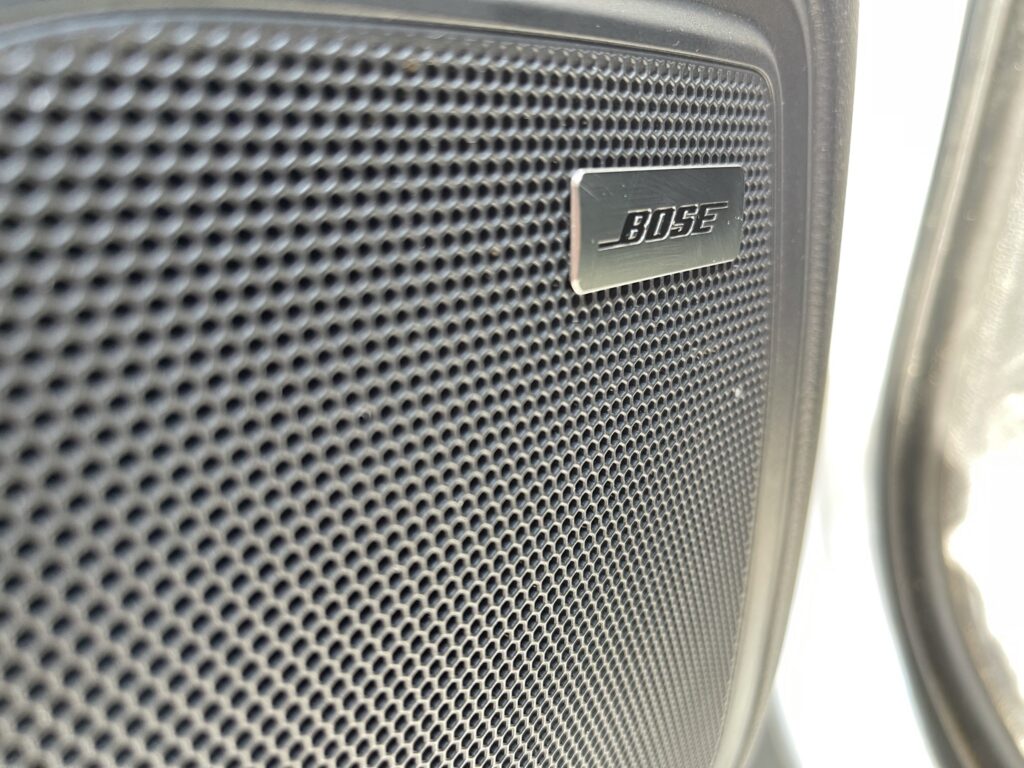
Bose amplifier
Park Sensors
Reverse Camera
Steering wheel controls
Porsche Macan Apple CarPlay radio upgrade – Metra 95-9616B installation kit
It is designed to retain the flow of data and various features that function through the factory radio. Yet, there is one component in this kit we don’t recommend using: the USB retention adapter.
Apple CarPlay and Android Auto requires a massive data transfer between the radio and your phone. We have found in various installations that many OEM USB ports are not capable of high speed data transfer. Sometimes they get hung up transferring that data. When that happens Apple CarPlay and Android Auto can flake out. That is why we prefer to route a new high speed USB to the factory USB location.
In addition to the Metra 95-9606B installation kit, we also used:
SAT1 to connect to and re-use the factory SiriusXM antenna
What is lost – what is retained
Access to vehicle settings
Once the radio is replaced, you do lose access to any vehicle information that was previously accessible through the factory radio. In this particular installation, that didn’t really matter to the client because they had already lost that access due to a faulty radio.
Radio information in multifunction displayer
Some European vehicles have what is called a multifunction display which shows up in the instrument cluster. This MFD can display stereo information such as what source you are listening to. If your Macan is equipped with this feature and you install an aftermarket Apple CarPlay stereo, you will no longer see any type of stereo information displayed in this menu.
Porsche Macan Apple CarPlay Installation – Bose amp retained, but fader control is lost.
Fader control
The stock Bose amplifier is digital. When that digital signal is retained it is converted to 2-channel analog. This means the aftermarket radio can support balance – left to right audio adjustment, but you will lose fader control – front to rear. All the speakers will play and the Bose amp and speakers are retained. You just lose the ability to fade between the front and rear speakers through the aftermarket head unit.
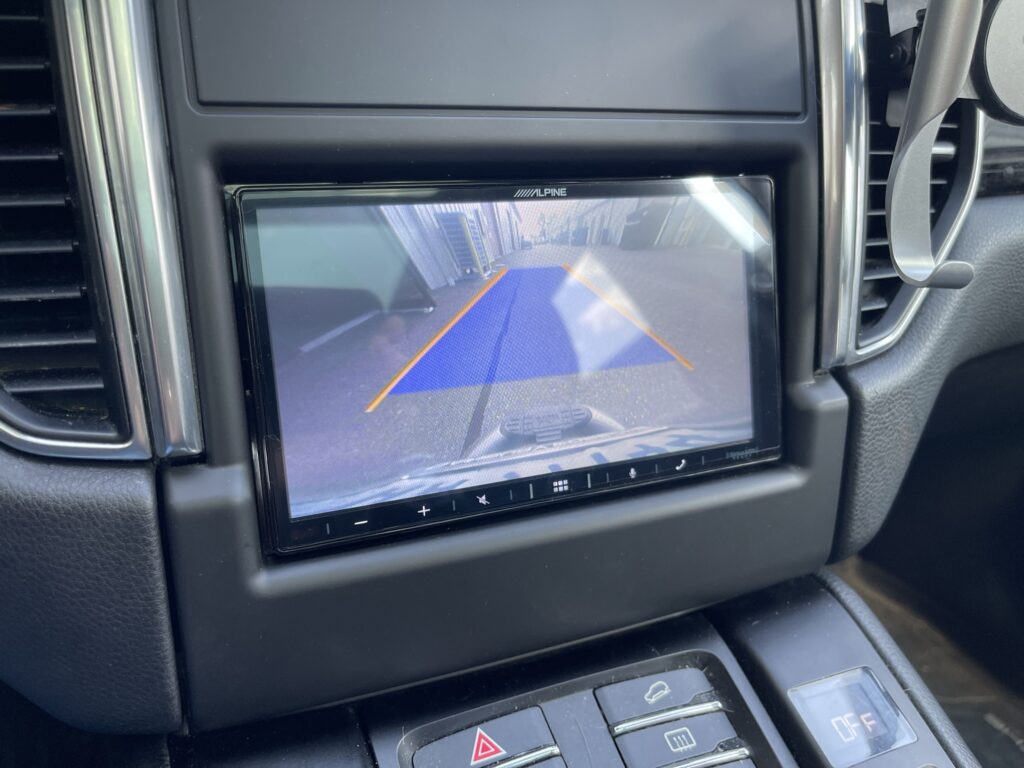
Porsche Macan aftermarket stereo installation – reverse camera retained.
Reverse Camera
We were able to retain the stock reverse camera as well as the audio and visual from the park sensors. Both features are displayed through the aftermarket stereo reverse camera input. If an object is detected on the front sensors, the display will automatically switch over to the sensor display.
Park sensors retained – Porsche Macan Alpine iLX-W650 installed
Park sensors
If you are backing up and an object is detected on the rear sensors, you can switch the display on the radio from the reverse camera image to the park sensor display. Simply press and hold the scrolling steering wheel control button on the left of the steering wheel.
Fit and Finish
If we had laser etcher at the shop, I would have loved to have put the Porsche logo on the top panel of the kit. It seems like weird dead space. I imagine that would have added a significant cost for the manufacturer to an already quite costly installation kit. The matte black finish matches quite nicely. I’m glad this client chose the iLX-W650 out of the various options we provided. It has a very minimalistic, sleek look to it which closely compliments the interior vehicle esthetics.
This week in the shop we installed an Alpine iLX-F411 in a 2017 Toyota Tacoma. The client did have one concern about the installation. Their vehicle was fitted with a front and rear camera. Why the concern?
Alpine iLX-F411 Toyota Tacoma Install – with existing front rear camera
This $1100 radio with a big, beautiful 11-inch screen has only has ONE camera input. Unless of course you buy the Alpine KCX-C2600B universal camera switcher. But who wants to do that? The KCX-C2600B includes a separate dash mounted button to allow you to switch between camera views since the radio does not have any on screen control over the non-existent additional camera inputs.
Pre-existing front rear camera switch
Thankfully, we have seen this before so we had an idea of what we would be dealing with. We had previously installed the 9-inch Halo in a Tacoma a couple years ago and that truck had a switch very similar to this. In that particular Tacoma, there was not only a front and rear camera, but also a third camera we tied into. Again with a radio equipped with just one camera input. Alpine – come on – people want more than one camera input. Just give it to them.
Alpine iLX-F411 Toyota Tacoma Install – with existing front rear camera switch
For that particular vehicle we made up our relay system to switch between the three cameras. There was a switch to go between front and rear and an additional switch to go between the two different rear cameras. Fun times with relays! However, for this Alpine iLX-F411 Toyota Tacoma install, we weren’t sure if we’d really have to make anything until we opened it up and saw how it was interfaced with the factory screen.
Alpine iLX-F411 Install – 2017 Tacoma with front and rear camera integrated switch
After opening it up, we saw how it was connected to the factory radio and it was actually a super simple in and out style T-harness with standard video connections. Thankfully we were able to simply re-use the existing switch with the single reverse camera input on the Alpine iLX-F411. It was one of the rare moments during an installers life where the wiring worked out to be much easier than anticipated.
Maestro recommended!
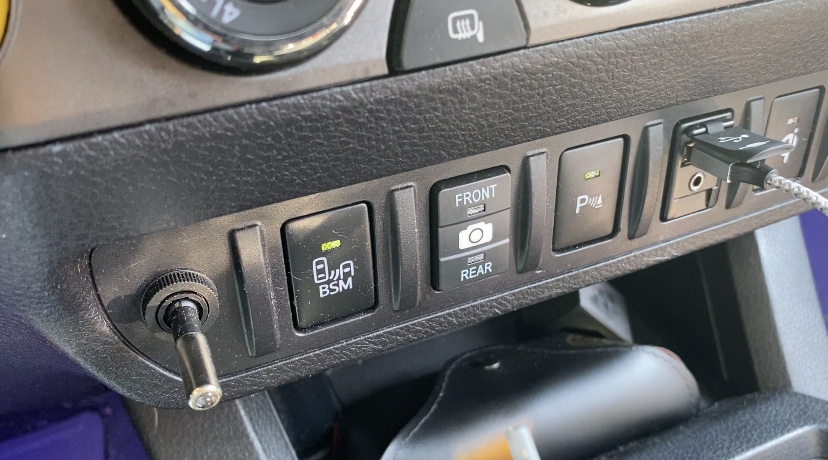
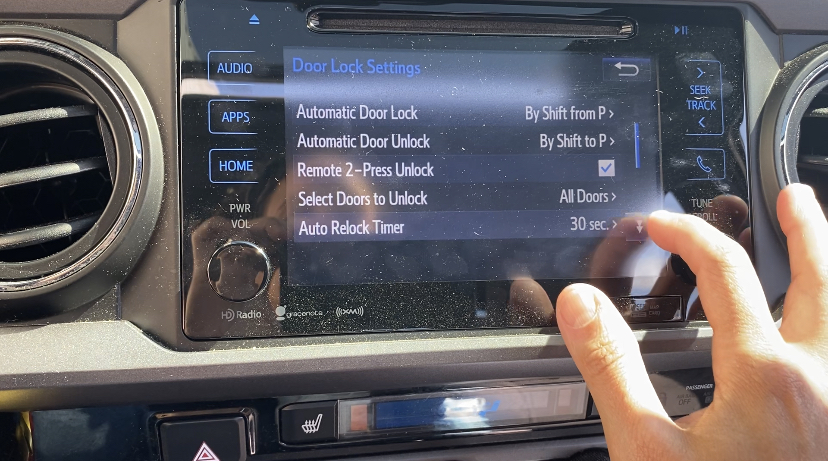
For the Alpine iLX-F411 Toyota Tacoma install, I recommend using the iDatalink Maestro. This interface will not only retain steering wheel controls and the OEM reverse camera, but it also retains access to vehicle settings. Some clients aren’t even aware of this menu because it’s on the second page of settings in their factory stereo, but check it out.
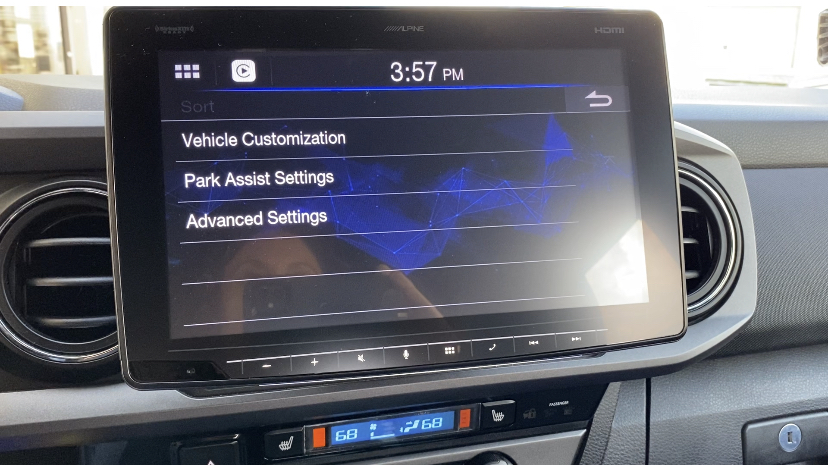
Toyota Tacoma – Retain access to vehicle settings menus with an aftermarket stereo using iDatalink Maestro
There are a whole bunch of personalization settings, door lock settings, lighting settings, park assist settings, etc. in this section of the factory radio. Unless you use an iDatalink Maestro module to retain those settings, they will be gone – no longer accessible once you replace the radio. Additionally, the Maestro module keeps data flowing through the factory radio so you don’t have to hear the dealer complain about any communication error codes stored in your computer because you installed an aftermarket radio. Use the right parts and keep all the features and data flowing.
Alpine iLX-F411 vehicle settings retained Toyota Tacoma
Bigger is better
Isn’t there a saying, bigger isn’t always better? I think in this case, bigger is better. What do the readers think? Correct me if I’m wrong. In my opinion, the larger the screen is, the easier it is to see what you’re trying to do with it. Therefore the less distracted you might be as a driver. With a screen this big, you may even be able to see what podcast you’re trying to select using your peripheral vision while you stay focused on the road ahead.
Alpine iLX-F411 Toyota Tacoma installed
In terms of features you do get quite a bit for your money with the Alpine iLX-F411.
Wired Apple CarPlay
Wired Android Auto
SiriusXM Ready
Front, Rear and Subwoofer pre-amp rated at 4 Volt
AM/FM Radio (not HD)
11-inch WGVA screen (wide graphics video array 480 x 800)
Single Din Chassis
5 Band EQ
Built in crossovers HPF and LPF
Digital Time Alignment
45 watts x 4 peak, 16 x 4 RMS per channel
Bluetooth
Single reverse camera input (compatible with KCX-C2600B switcher expansion module)
Customizable icons and display
HDMI input and output
3.5MM AUX input
iDatalink Maestro Compatible
What’s missing?
I am disappointed with the 5 band EQ vs typical Alpine 9 band, but that appears to be what Alpine is using with most of their newer touch screen operating systems. For the less tech savvy/audiophile consumers, they may find the 5 band EQ much easier to use. The other major bone of contention is the connection for Apple CarPlay and Android Auto is wired, not wireless. In fact Alpine hasn’t had a wireless model since the iLX-107 a few years back. Perhaps when the chip shortage, cost of raw materials and global shipping headaches settle – which I don’t think will be until late 2022 – they may introduce a new model with the feature.
Still, overall, the Alpine iLX-F411 does have a lot going for it. It’s quite versatile in how it can be mounted allowing it to fit in a lot of vehicles that wouldn’t normally accommodate such a large screen. The fit and finish of the edges of the screen are quite nice with a satin metallic trim. From a screen resolution and overall value stand point? If you can get your hands on one and you’ve got the double din chassis to fit it, I am more inclined to go with a Kenwood DMX1037s which features:
Wireless Apple CarPlay and Android Auto
High resolution display
13 Band EQ
FOUR camera inputs
Although I’m a bit torn. I do love the volume knob on the Kenwood DMX1037s, but I think Alpine’s screen edges are softer and cleaner. The gloss black on the Kenwood DMX1037s can make it stick out a bit on certain dashes. Whereas the Alpine’s softer edges seem to blend in better on most vehicle dashes.
What features matter most?
Buying an aftermarket head unit always includes some kind of trade-off unfortunately. The trick is to consider what features are most important to you and base your decision off that. Is it sound quality? Screen quality? Ease of use? Audio control? Overall appearance? Camera inputs? What features are most important to you?
Local to Brookfield, CT? To learn more about what options we have available for your vehicle, contact me or visit our shop.
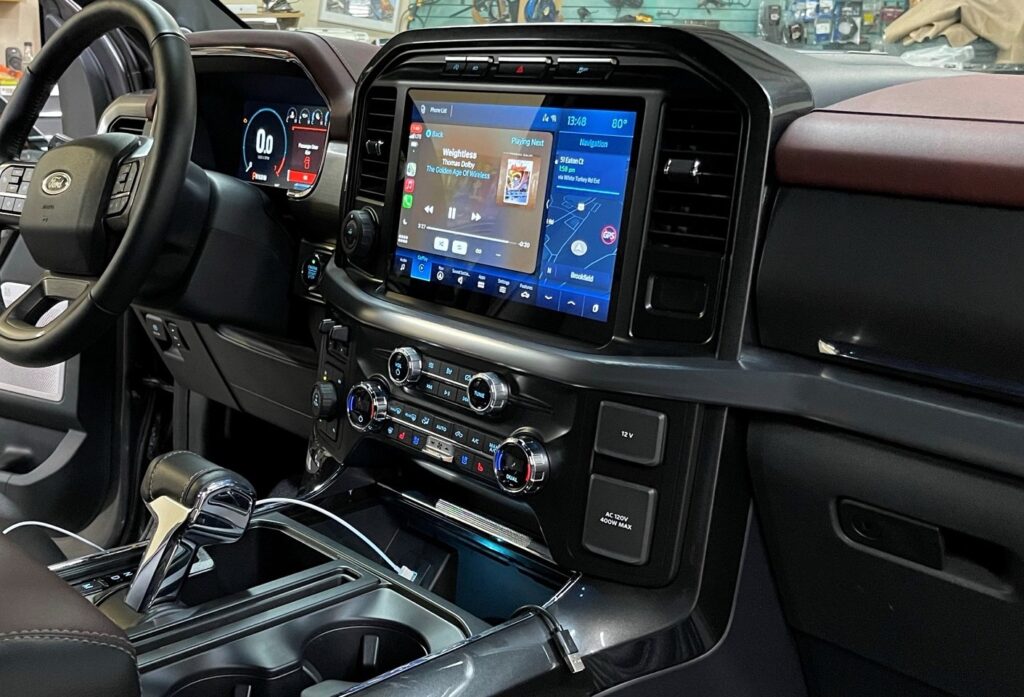
This week in the shop we performed a complete stereo upgrade in a client’s 2021 Ford F-150. This client’s truck came equipped with the factory “premium” stereo which features a gorgeous 12″ infotainment screen and Bang & Olufsen stereo system.
2021 Ford F-150 stereo upgrade – 12″ Infotainment with B&O stereo
Nearly everything about this truck is absolutely stunning. Ford did a phenomenal job with the overall design and functionality. The detailed cabin touches manage to exude luxury and practicality at the same time which is not an easy feat to pull off.
2021 F-150 Stereo Upgrade – Tailgate illumination
One of my favorite features about the truck is the bed. From the super bright light by the reverse camera, to the built-in phone holder, convenient inlaid ruler and discreet bottle opener – the back of this truck is like a swiss army knife on steroids. Yet, despite all of it’s luxuries, the B&O stereo still leaves much to be desired.
How to upgrade the stereo in your 2021 F-150 without looking like you upgraded the stereo
When our client reached out to us about upgrading the sound, I immediately thought of using a pre-amp adapter – either from PAC Audio, NAV-TV, Maestro or Mobridge. Pre-amp adapters are a growing category of parts that enable us to install complete aftermarket audio systems that are integrated with factory infotainment systems. We can install aftermarket amps, speakers and subs, without sacrificing sound quality through a line output converter.
Most newer vehicles are equipped with the kind of radio that you realy can’t just replace even if you wanted to. But look at that screen, why would you want to change that? The radio is essentially part of the computer network in the vehicle.
Digital Pre-amp adapter
This is how it works – there is a digital signal coming from the factory radio. You plug in your smart phone. It reads the data and sends all that data as one’s and zero’s to the stock amp. At that stock amp is where the sound is actually converted from digital to analog. It’s then fed to the stock speakers.
Ford F-150 stereo upgrade – B&O has got to go
And that stock amp is unlike any typical aftermarket amplifier. It has numerous channels on it to power each individual speaker. Each channel has a very specific frequency range designated for its corresponding speaker. If you wanted to tack on an amp after it, you’d first have to sum all of the frequencies and then use a DSP to clean up the signal. Even still, you’d be double processing at that point which is far from ideal.
What’s the weak link?
That stock amp is the weak link in the chain. So how do you bypass it? A pre-amp adapter can interrupt that signal from the factory radio while it’s still digital, before it’s been processed by the stock amp. By interrupting it before it’s been processed, it takes that digital signal and converts it into a clean RCA pre-amp output that can then be fed to aftermarket amps and speakers. The end result is an aftermarket stereo that integrates with the OEM operating system and by all appearances retains the stock esthetics. All warning chimes, vehicle information and audio controls are retained seamlessly. In this application the stock amp is removed completely and the pre-amp adapter and aftermarket amps take its place.
NAV TV – NTV-KIT889 ZEN A2B
Quality components
Initially, I wanted to use the Mobridge Pro A2B because it offers some additional fine tune control. Unfortunately we experienced a few compatibility issues with that module in this car. For this particular install we used the Nav-TV NTV-KIT889 which worked flawlessly.
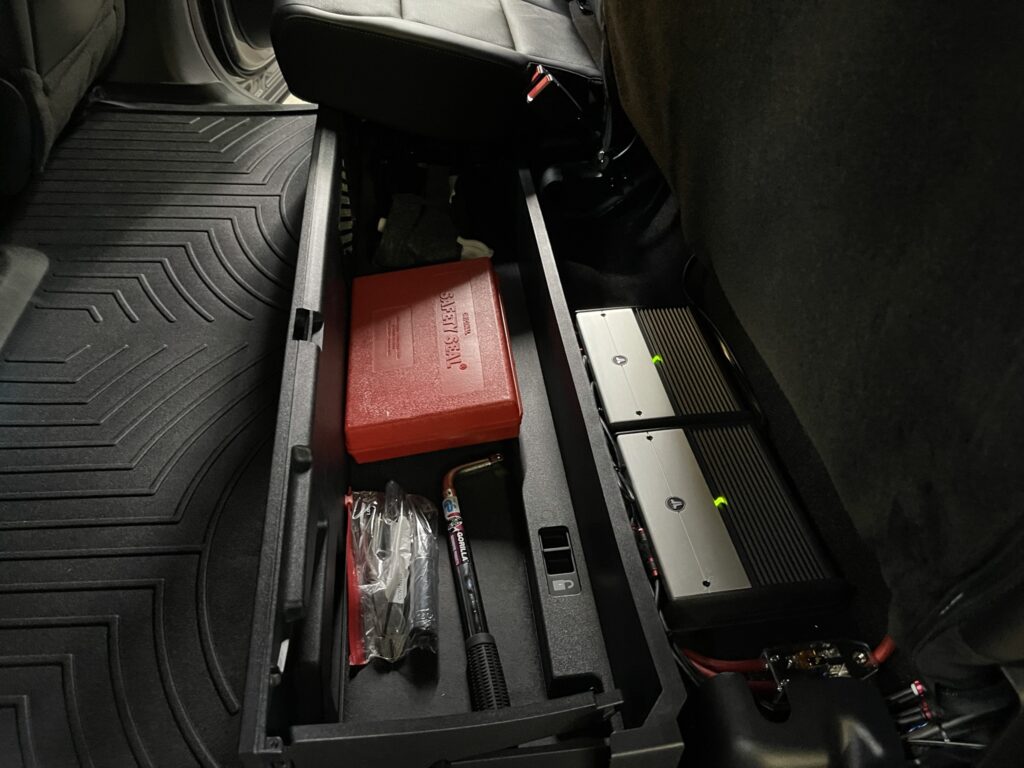
2021 F-150 stereo upgrade – JL Audio amps
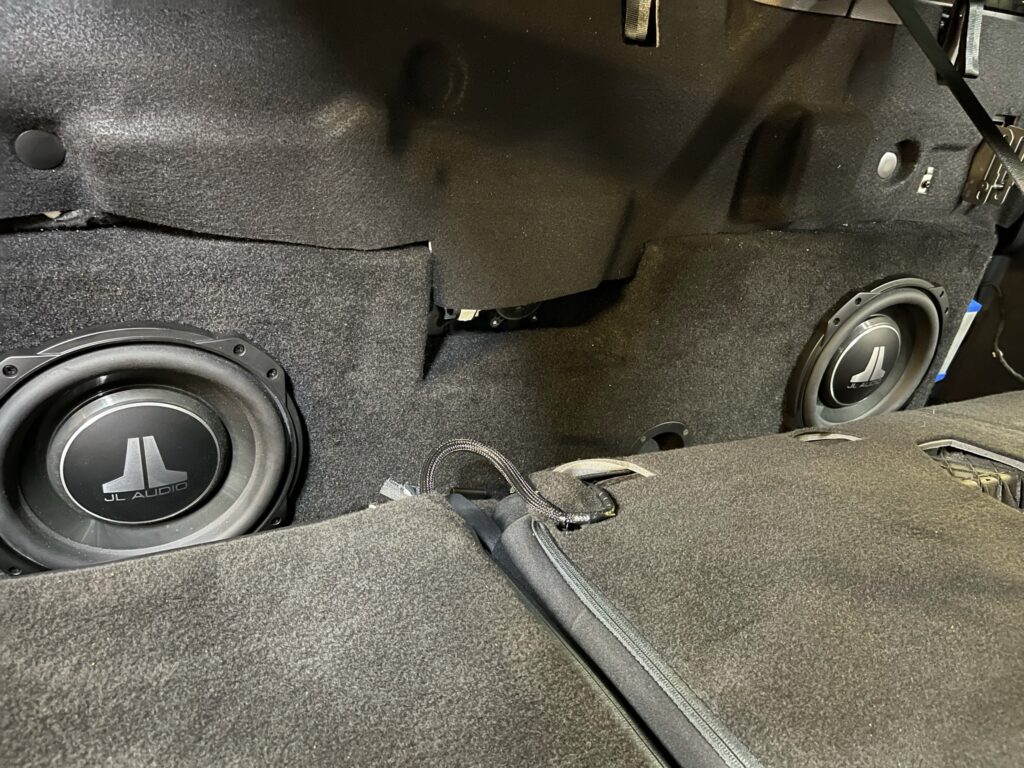
With a clean pre-amp level signal to work with, we installed higher quality aftermarket Focal Flax series speakers, two JL Audio amplifiers and two JL Audio 10″ subwoofers. In order to maximize the clients usable space, we installed the amps behind the existing under seat storage tray area. Behind the rear seats, we installed an MTI double 10″ subwoofer enclosure.
It’s definitely a tight fit for the two JL Audio 10″ TW3 subwoofers. It did require some modification to the existing carpet behind the rear seat. In fact, it’s such a tight fit, we couldn’t even use speaker grilles with this enclosure. Yet, as you can see, it’s fully functional. With the rear seats in their upright position, you’d never know there were two amps and two 10″ subs in there – that is until you cranked up the stereo of course.
The end result is the client is now experiencing their music in an entirely new way – as if hearing it for the first time. Details and nuances previously unnoticed are now present in songs they’ve listened to countless times before. Great sound doesn’t have to be complicated. The key is to use the right parts for the application, execute the installation properly followed by a professional tuning. If you’re interested in upgrading the stereo in your truck, call/text, email or visit our showroom today.
Attempting yourself? Here are the components used in this build.
Remote Bass Knob – 2021 Ford F-150 stereo upgrade
For the do-it-yourselfers out there, here’s a handy list of components used in this build:
As technology on the OEM side progresses, our industry is staying on top of it with state of the art components designed to integrate with a vehicles advanced electronic system. The end result is clear, vibrant, detailed and punchy aftermarket sound all while retaining the OEM appearance and functionality. Have you upgraded the stereo in your Ford F-150? What components did you use?
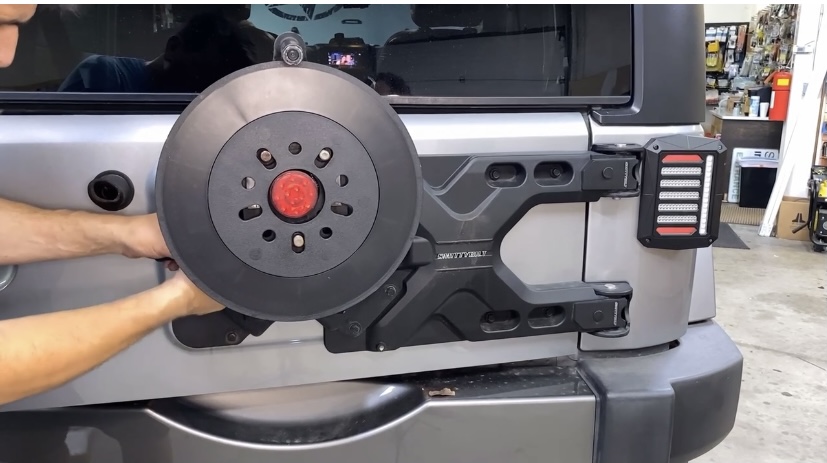
Installing an LED third brake light behind the spare tire on your Wrangler is a super quick and easy upgrade. This LED third brake light kit from LED Factory Mart has an attractive concentric design accented by additional lines of LED’s that spiral out from the center as the brake is fully depressed. Not only is the illumination pattern unique, but the plug and play design of the kit makes install a breeze.
Smoked 14″ Cyclone Series 3rd Spare Tire LED Third Brake Light For 07-18 Jeep Wrangler JK -Factory LED Mart
With 150 LED’s rated at IP67 and 50,000 hour lifespan, this product appears to be built to last. Only time will tell. The winters in New England are pretty brutal. Just take a look at the rusted out housing on my reverse camera which is due to be replaced soon. Thankfully, this LED third brake light does include a 1 year warranty.
Installation video – LED Factory Mart LED third brake light
This is such a super straight forward installation making it a great accessory for do-it-yourselfers. The only difficult part may be removing the spare tire. You may need a second person to help you with that. Additionally – this kit assumes you still have the factory 3rd brake light in tact. If you have an aftermarket spare tire carrier like I do, then you may end up having to cut and splice.
Step 1 – remove the spare tire
Using a 9 MM socket – carefully remove the spare tire. Use caution! It’s heavier than you think. You may need a helping hand.
Carefully remove your spare prior to installing your LED third brake light
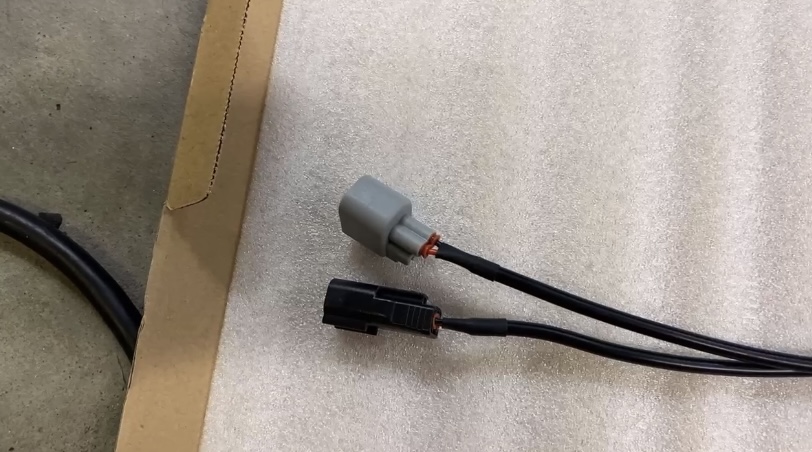
Step 2 – remove the 4 T20 Torx screws holding in the factory third brake light.
This allows you to gain access to the factory third brake light wire connector. This is how you will connect the aftermarket LED third brake light.
Remove the four T20 Torx screws
Step 3 – Place the LED third brake light on the spare tire carrier.
Make sure to mount it with the wire side facing away from you and on top. If you have an aftermarket reverse camera, you may need to adjust your camera mount to accommodate the LED third brake light.
Route wiring – ignore the rusted out EchoMaster reverse camera housing due to be replaced on another day and time.
Step 4 – Connect the included T-harness
Use the included T-harness to connect to your existing third brake light wiring. This is just a simple in and out connection. Route the wiring down under the cover and re-attach.
Included plug and play T-harness
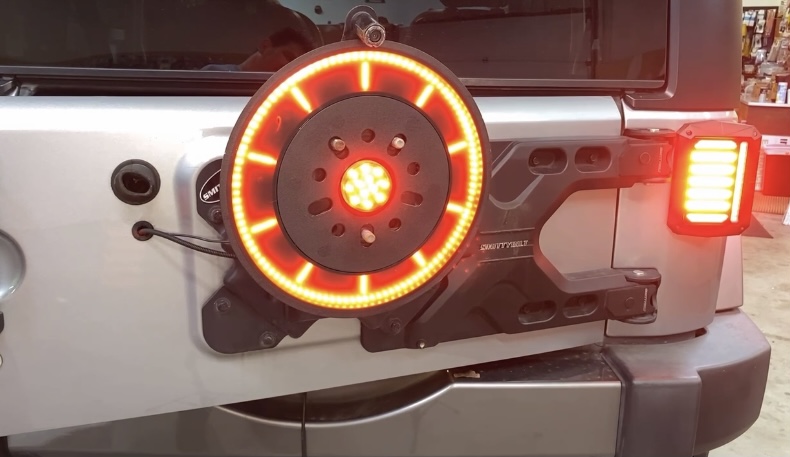
Step 5 – Test it out
Make sure everything is working properly before re-attaching your spare tire.
Testing the LED third brake light in my 2014 Wrangler JK
What if you don’t have the OEM Third Brake Light?
I have an aftermarket spare tire carrier on my Jeep that already included an alternate LED third brake light. The existing aftermarket third brake light I had was pretty small and dainty. I’d always wanted something a bit more robust and attractive which is why I was super excited when LED Factory Mart reached out to me about reviewing this kit. It was a perfect excuse to finally schedule some work on my own Jeep which is often neglected just because we’re always so busy at the shop working on client’s vehicles.
Cutting and splicing
After taking everything apart, we realized, I no longer had my OEM third brake light connector. I think we had to cut and splice when installed the SmittyBilt spare tire carrier. Using a test light, we opened it up and checked for brake positive and ground. Once we had the wiring identified, we cut and spliced the harness that came with the LED Factory Mart kit.
Conclusion
Overall, I’m really happy with the end result. It’s just such a quick and easy way to enhance your Jeep’s appearance while also adding a bit of safety. This third brake light is much more visible than the factory brake light. For most Wrangler owners out there this will be a 10-15 minute install. Just keep in mind – if you don’t have the factory third brake light, it will be a bit more work to make those connections. Have you installed this LED third brake light from LED Factory Mart? What has your experience been?
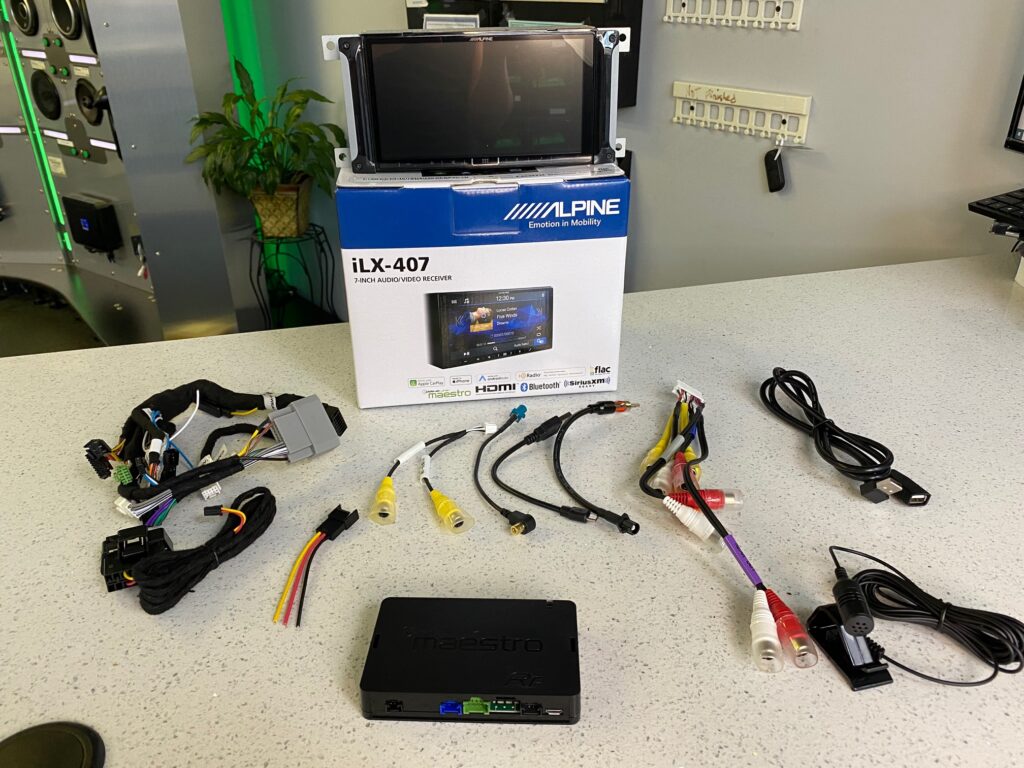
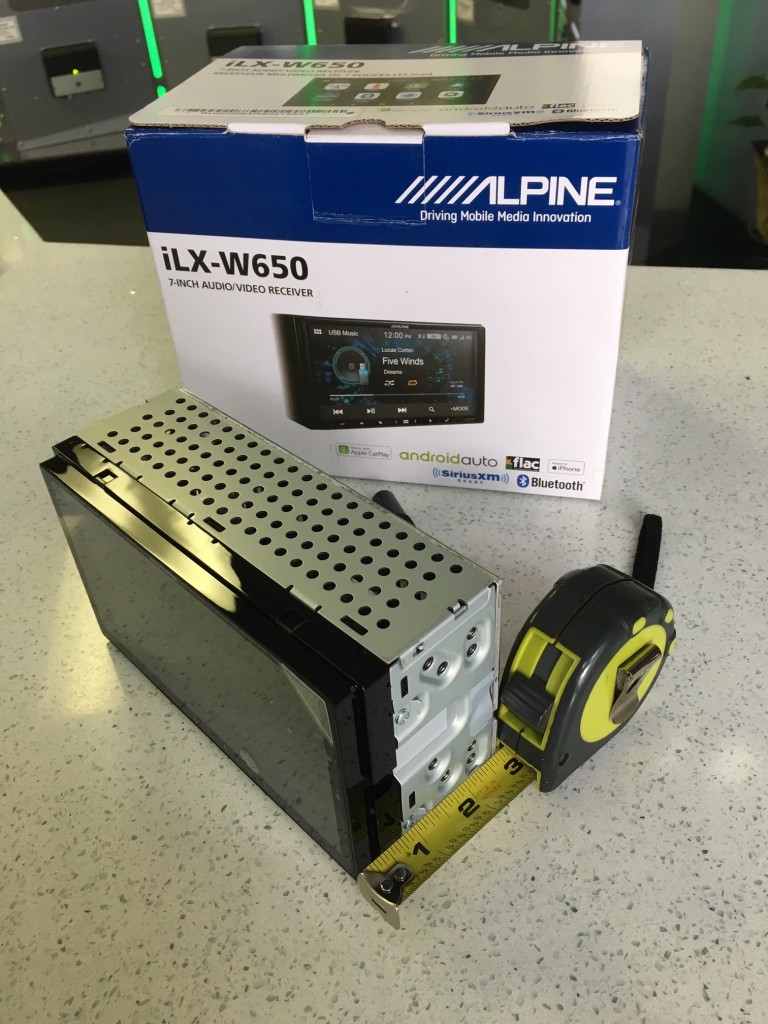
This week in the shop I received a couple of long awaited Alpine iLX-407’s. Actually, what I received were the i407-WRA Restyle kits for 2011 – 2018 Wrangler JK. But inside that box was an iLX-407 which I immediately pulled out and wired up so I could write this Alpine iLX-407 review.
iLX-407 Review – Back side of radio
For those unfamiliar with Alpine’s Restyle kits, the i407-WRA is the Alpine iLX-407 plus a very nice Wrangler dash kit, iDatalink Maestro module and a pre-wired harness with all necessary install parts. It’s a very nice plug and play sort of kit Alpine has put together for 2011 – 2018 Wrangler JK. Additionally all Alpine restyle kits have a 3 year warranty vs the standard 1 year warranty.
Alpine i407-WRA bundle which includes iLX-407 and all necessary install parts.
Why the delay?
After numerous delays due to the chip shortage, raw material shortages, global shipping challenges and the nightmare that 2020 was and that 2021 continues to be – I am grateful to Alpine for their support. Like everyone else in our industry, I have a ton of backorders. However, they have been great about staging releases, allocating the limited inventory that is available and even air freighting in product (at a much higher cost to them) in order to support their strong independent dealers and keep things rolling. It seems like right when I’m about to be completely sold out with no ETA in sight, they release another backorder so I and our team at the shop can continue to do what we love.
Alpine iLX-407 pictured with i407-WRA install kit – Apple CarPlay
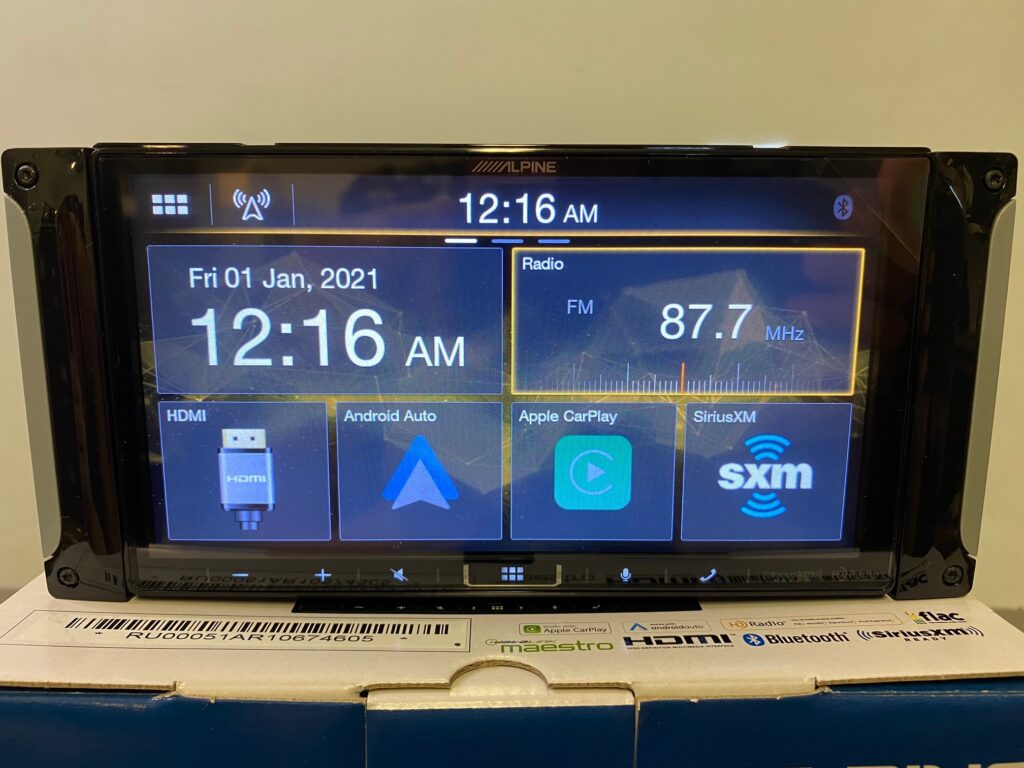
Let’s talk about the radio
All gushing aside about the company itself, I am super stoked about this unit. It has an attractive and sleek, minimalist design – similar to the iLX-W650 (which will continue to be a part of the Alpine line up). There are some major key differences and upgrades over its predecessor. One of the major differences is this model is iDatalink Maestro compatible.
Key distinctions between the iLX-W650 and the iLX-407:
iDatalink Maestro Compatible
HD Radio
HDMI input
Multiple background colors to select from or upload your own splash screen
5-band EQ
Shallow mount is where it’s at!
Interior automotive design has changed a lot in the past couple of years and there are some vehicles out there – like the 2014 Ford Explorer in my garage right now – that are only going to be compatible with a shallow mount, mechless iDatalink Maestro radio. That’s assuming the client doesn’t want to lose anything when they “upgrade”. If they want to retain the features of the vehicle like the climate controls, reverse camera and access to vehicle settings while adding new technology like Apple CarPlay or Android Auto, then the iLX-407 is going to be a perfect fit. You can also put 2018-up Wrangler JL into that category. Shallow mount, mechless is the only style that will pass muster. My point being this radio will be perfect for a lot of vehicles on the market that have these kind of space and technology restrictions.
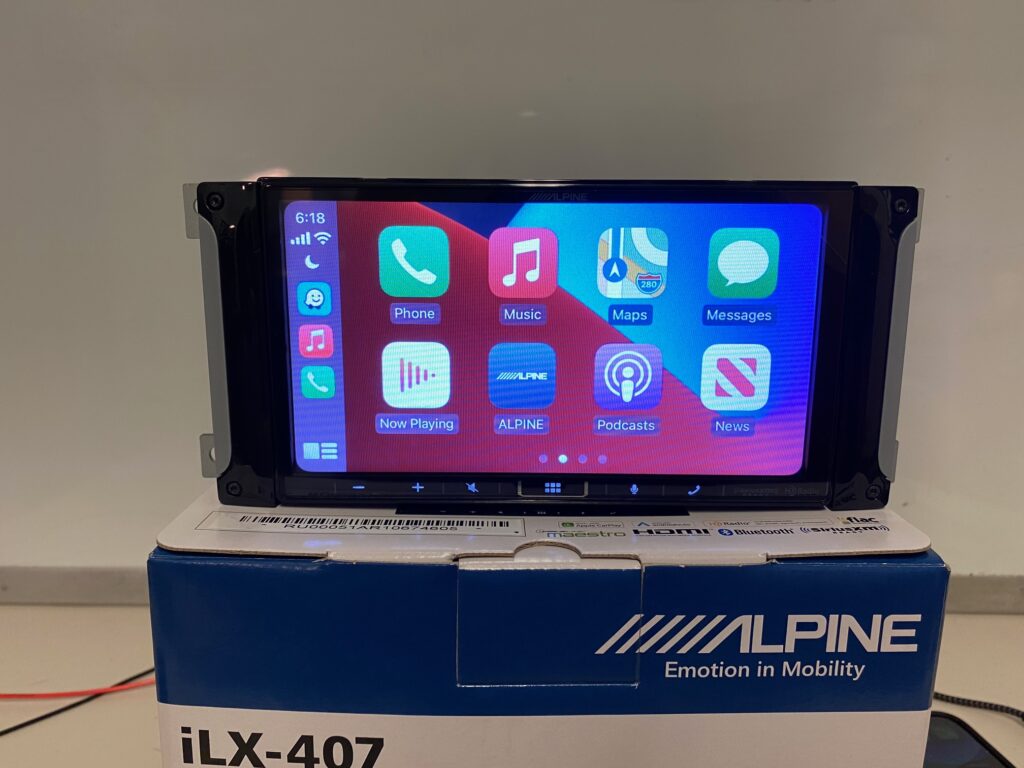
Alpine iLX-407 – Home page
Customizable
Unlike the iLX-W650, the iLX-407 has more screen customization controls. You can easily press and hold a source icon and drag and drop it to another page. I love this feature because I like to be able to organize icons in the order that makes most sense for the client. Usually what I do is place what they need on the home page and leave the sources they will rarely access on the 2nd and 3rd pages.
Alpine iLX-407 – Page 2 of the radio screen
Not only are the icons easily rearranged, but the colors can be changed. There isn’t a creepy blue iris staring at you like there is on the iLX-W650 home page. Instead you have a few different color splash screens to choose from or you can even upload your own.
Alpine iLX-407 Review – Color and splash screen options
Sound quality features
Although I didn’t have the ability to wire this up to my display board to listen to it with speakers, I can tell you looking at the chassis and specs, I suspect it sounds just as great as the iLX-W650. It appears to be the same exact chassis and like the iLX-W650, the iLX-407 is also made in Korea. However, there are some key differences in the audio control.
Alpine iLX-W650 Review – Audio menu options
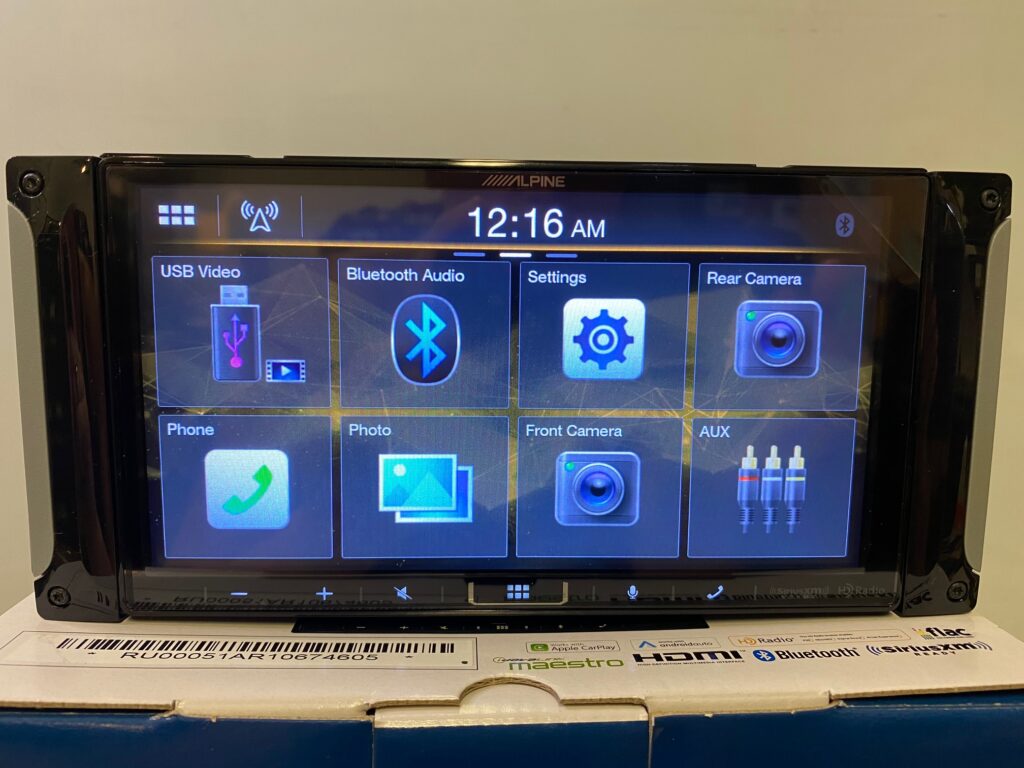
The iLX-407 includes features we’ve grown to expect from Alpine such as:
Time Alignment
Crossovers
Easy audio controls like bass/treble plus more advance EQ controls
4 Volt front, rear and subwoofer pre-amp output
24 bit DAC
Alpine iLX-407 Review – Basic audio controls
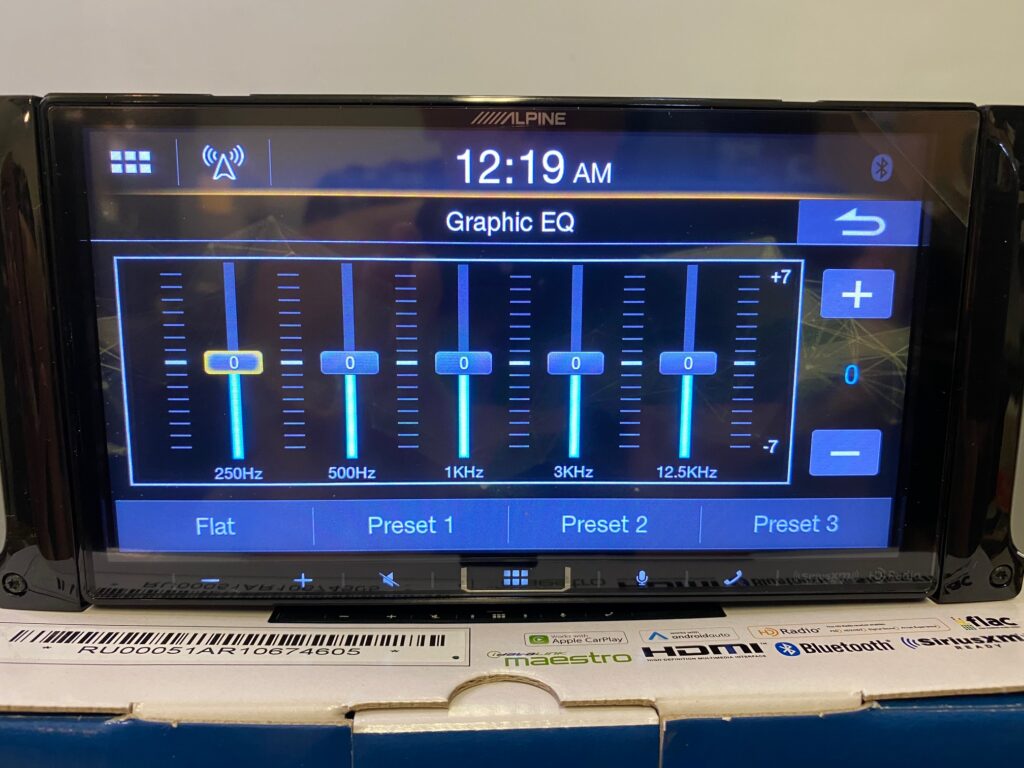
However, the graphic EQ is a bit of a disappointment for me with only 5 bands of equalization. At the same time, from an ease of use standpoint, I totally get why they did that.
Alpine iLX-407 Review – 5 band EQ
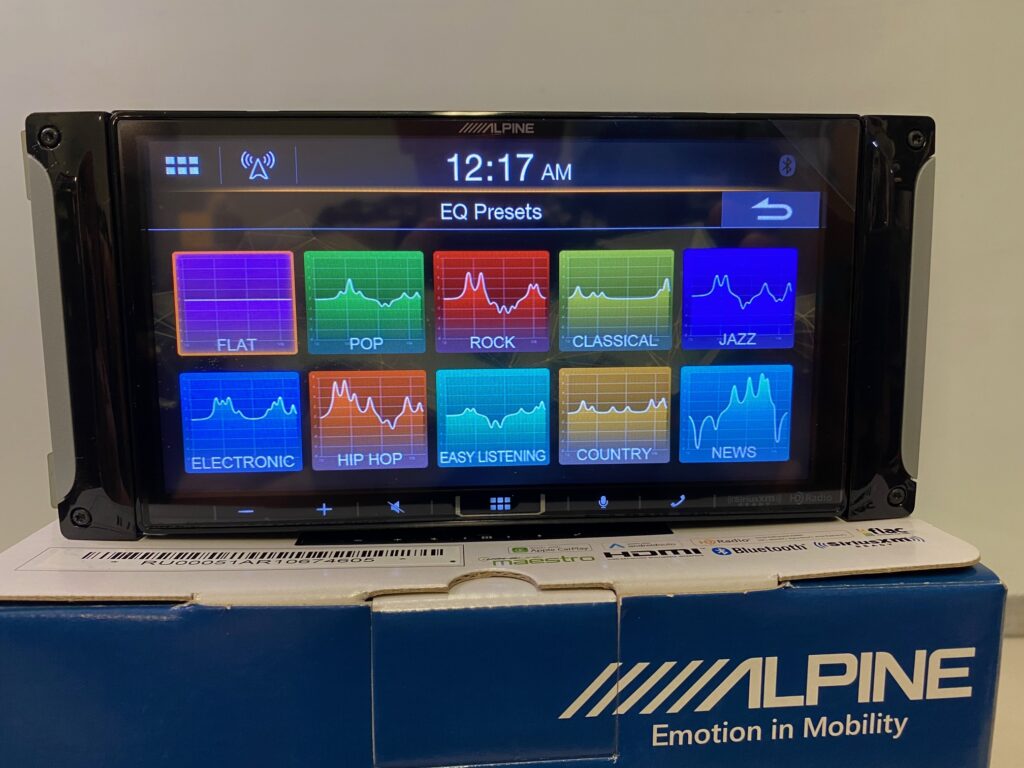
End users can easily be overwhelmed when they see a 9-band parametric EQ or 13 band graphic EQ. For many, less is more. Yet even a car audio novice can appreciate that 5 bands is definitely better than 3.
Alpine iLX-407 Review – Preset EQ curves
If they provided more than that, it might get confusing for someone just looking for some basic mid range adjustment. With 5 bands, they’re kind of in that goldilocks zone. In addition to the 5-band graphic EQ, the iLX-407 features several preset EQ curves making it even easier for the less than tech savvy to adjust.
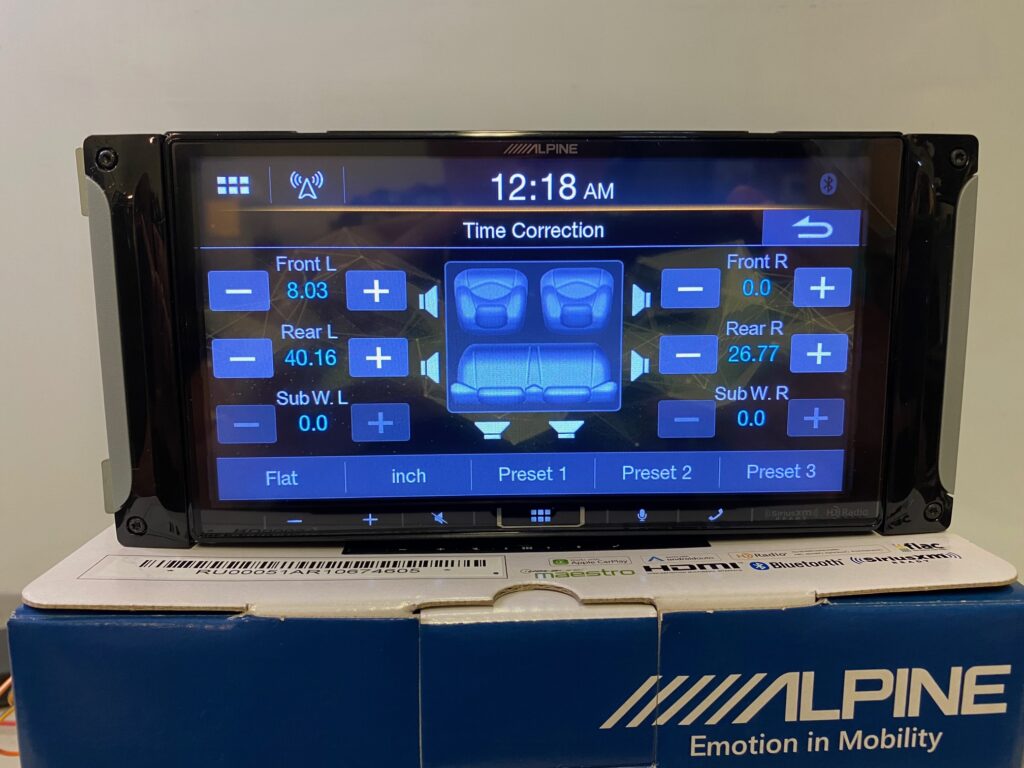
Alpine iLX-407 Review – Time alignment menu
Those that are more technologically inclined will appreciate the time correction menu. This is probably a feature the average user will overlook, but for anyone setting up a high fidelity audio system, this is a great tool to have.
Alpine iLX-407 – Best Value Apple CarPlay Android Auto radio 2021
I think it’s safe to say this is going to be the best value Apple CarPlay Android Auto radio of the year. For not much more than the iLX-W650, the iLX-407 packs in the features:
Multiple display options or upload your own background
Customizable source icons
For those interested in using the HDMI input for Apple, you will need an HDMI Cable and a lightning to digital A/V adapter. Readers interested in buying an Alpine iLX-407 should note most dealers have not received them just yet. Although it’s still a good idea to contact your local Alpine dealer since most already have them on order and perhaps they can notify you once they arrive. What do readers think of this model? Please let me know in the comments below.
On nearly a weekly basis at the shop, I find myself assisting clients with their Android Auto connectivity issues. These hiccups usually occur long after installation and can be incredibly frustrating to resolve. The most common complaint I hear is that it doesn’t work consistently. Or it might have worked perfectly for months with no problem, but now all of a sudden it only works for 5 minutes at a time before disconnecting. Most of the time there doesn’t seem to be any rhyme or reason for the failure.
Although I’m not an Android user myself, I’ve learned a few tips and tricks over the years on how to resolve these Android Auto issues. When searching for answers to assist my clients, I realized no would had really put together one single punch list so that is what I’ve attempted to put together here. I’ve picked up a lot of this info just from my own research, reading through TSB’s and largely from the numerous tech support calls I’ve made to manufacturers like Kenwood, Sony, Pioneer and Alpine. In this post I will be sharing all the ways I’ve been able to resolve Android Auto Connectivity issues.
#1 – Cabling issues
Now I know a lot of my end users will say “I tried another cable, I tried three different high quality USB C cables, it didn’t make any difference.” Okay, but there is more to it than that, hang with me here.
How is the USB cable connected?
Directly to the radio’s USB port?
Through an extension?
Through the OEM USB port?
With Android Auto you want your USB length to be as short as possible. Most aftermarket head units are going to come with a 1 meter USB extension. If you add a flush mount extension and your USB Sync/Charge cable on top of that, you’re probably over 9 feet – that’s a big no, no for Android Auto.
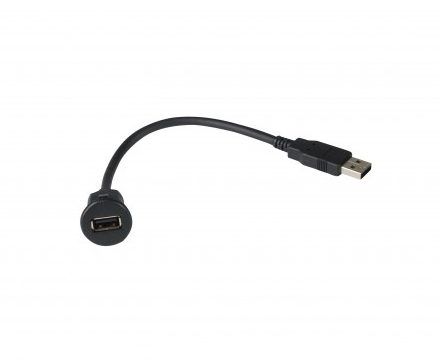
The Android Auto community specifically recommends avoiding using USB extensions. If you must extend to flush mount, we recommend the PAC Audio USB-DMA1. This is a high speed, USB C compatible, 12″ flush mount accessory. It’s a minimal extension of the aftermarket radio’s USB that allows you a clean way to install the USB port.
High Speed USB C Compatible flush mount – PAC Audio USB-DMA1
If you’re using any other type of extension then your overall cable length is probably too long. If you’re using an adapter that connects to an OEM USB port then you will experience issues. Chances are that original USB cable that came with the car is USB 2.0. It’s probably not a high speed USB C compatible cable which is what you need to work with Android Auto. Therefore most factory USB retention adapters are not going to be compatible with your aftermarket Android Auto radio.
In fact, even if your vehicle came equipped with Android Auto, it might need a high speed USB swap. I have seen TSB’s that recommend changing the OEM USB port and cable to a newer higher speed Android Auto compatible one. If you have a vehicle that is a few years old with a factory radio that is having Android Auto connectivity issues, ask your dealer if there is TSB on the issue. They may need to update the USB cable and port in the car.
So what is the right cable?
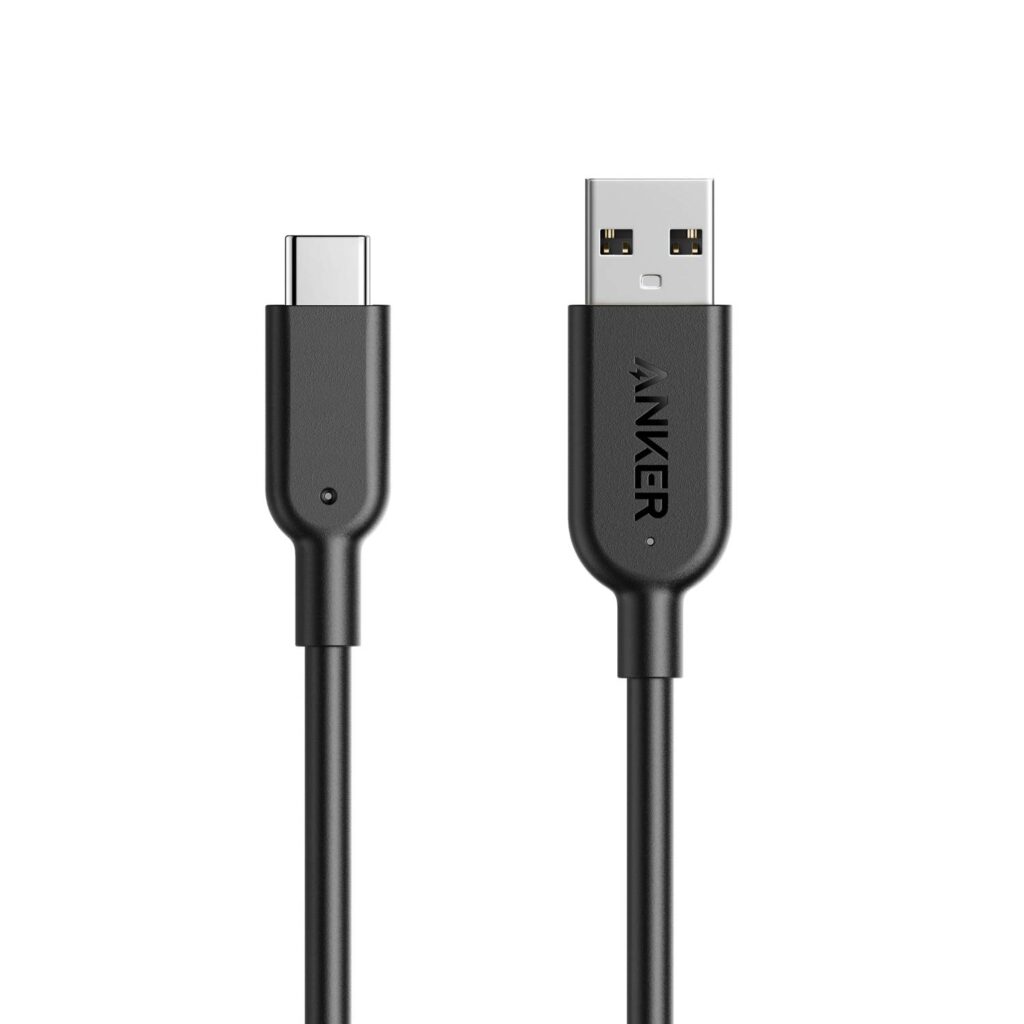
That all depends on your phone. Personally, I’ve had good luck with 1 meter Anker cables for select Samsung phones.
Anker USB C
However for most phones, and especially the Google Pixel, you are best off using the original charge/sync cable that came with the phone. Or maybe just buy a head unit that supports wireless Android Auto (Seriously, Pixel, why so picky?).
#2 – When’s the last time you restarted your phone?
If you’re having Android Auto connectivity issues, it’s always a good idea to restart your phone. This is an easy way to clear cache or problematic apps running in the background. A lot of times when I’m having trouble getting a clients phone to work with Android Auto, I ask, “When’s the the last time your restarted your phone?”. Most truly cannot recall. Sometimes all it takes is a restart to get everything working properly.
#3 – Check for app updates
Although your phone’s operating system may be up to date, and it may even be scheduled to do automatic updates, there may be a problematic app that needs updating. App updates are separate from software updates. Go into Google Play to check and see if there are any available app updates. If there are, go ahead and do the app updates. Next, close out all open apps and restart the phone if you haven’t done that already and then try again.
#4 – Start from scratch
The other thing I like to do when a client is experiencing Android Auto connection issues is to clear memory from both devices. Go into the Bluetooth memory of your radio and delete your device along with any other devices that are stored in the memory. Then go into the Bluetooth settings on your phone and unpair/forget the device from your phone. Once memory has been cleared from the phone and the radio, go ahead and reconnect your device.
Clear Bluetooth memory from your device and from the radio.
Android Auto should pop up as if it’s been connected to the device for the first time. Pay attention to all the Android Auto prompts making sure that you give it all the permissions necessary to function. If you deny one of these permissions, that can cause connectivity issues.
#5 – Delete and reinstall problematic apps
Sometimes Android Auto works, but there is one app that just isn’t working right. Maybe Pandora or Spotify won’t launch or maybe the app is on your phone, but you can’t select it from the Android Auto screen. Maybe you see Waze, but you can’t open it because you get an error. Sometimes this is simply that you aren’t logged into the app so the app won’t open up on the screen. Turn your car off, open the app on your phone and make sure you are logged in and that the app is fully functional on your phone. If it’s not working right on your phone, it certainly isn’t going to work right when connected to Android Auto. I’ve had a few clients have this issue with Waze. It didn’t work simply because they weren’t logged in. Other times I’ve had to delete the app, reinstall it and make sure they logged in successfully on the phone prior to connecting.
In all instances thus far, I’ve been able to get problematic apps to function again simply by deleting and reinstalling them.
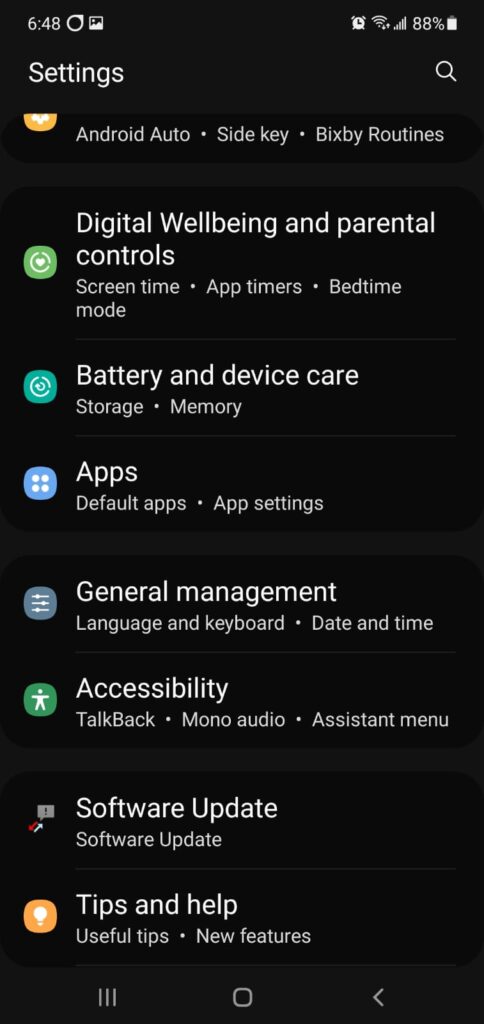
Not sure how to do this? First go to settings and find the app manager.
Go to settings to find the App manager
Next you will want to find the app and uninstall it. Once deleted, go back into Google Play and redownload the app.
Find the problematic App – uninstall and then redownload.
Make sure you are logged into the app before attempting to select it on Android Auto.
Also, if you’re using any kind of VPN app or antivirus app, disable and delete it. They don’t play nice with Android Auto, sorry.
#6 – Force stop Android Auto, revert to previous version then update to the latest version
Although you can’t delete and reinstall Android Auto, this is another way to clear the cache and clear any quirks that might be occurring. To do this you have to go into the application manager, find the Android Auto app, force stop and disable it. At that point you can revert to an earlier version and then go ahead and update it to the current/latest version.
Force Stop and Disable Android Auto
I rarely have to do this last step, but I did have one client recently with a Samsung phone that was really, really glitchy. Between this step and the Anker cable connected directly the Android Auto radio’s USB input, I finally got it working consistently for him.
Final tips and tricks
Developer Options – USB Debugging
Years ago, I used to turn on developer options and turn on USB debugging, but lately this seems to cause more harm than good. So if you’ve read that tip somewhere else, perhaps in an older article, I wouldn’t recommend trying that now.
Smartwatch interference
If your Android Auto is connected, but you can’t hear what’s playing, and you happen to be wearing a Smartwatch – try turning off your Smartwatch. This is not a super common issue, but I can recall at least one client’s Smartwatch causing interference with Android Auto.
What worked for you?
Although this is not an exhaustive list of every possible thing you can do to correct Android Auto, these are all the tricks I have learned and use regularly at my shop to successfully resolve Android Auto connectivity issues for clients. Most of the time it’s as simple as cabling issues, but there are other times where I have to do everything on this list to resolve Android Auto connectivity problems. I hope you have found this information helpful. Thanks so much for reading.
If you have another Android Auto connectivity tip or trick to share that I haven’t covered, please let me know in the comments below.
Most of my readers know that each year I usually post an in depth review and breakdown on the best Apple CarPlay and Android Auto head units available. Before I dive into the Best Apple CarPlay Android Auto head unit 2021, let me step back a moment. I skipped this review last year for a variety of reasons.
Number one – I was short staffed at the shop due to the Orwellian dystopia that fell upon our world. I had no time to write.
Number two – it was like 2020 never arrived. New products announced at CES 2020 didn’t roll out until the end of 2020 or early 2021 if they did get rolled out at all. Manufacturers shut down due to COVID-19. Shortly after that inventory quickly became backordered across all brands.
Car Stereo Chick Inventory Image
Finding a CD player or amp wiring kit was like trying to find Bounty paper towels at Costco last spring. If a pallet showed up at a wholesaler, it vanished sometimes in as little as a few hours. Our industry has not been exempt from the ongoing wrath and absolute shit show of 2020 and there are additional contributing factors that imply 2021 is going to be even worse when it comes to product availability for consumers.
Why is everything backordered right now?
A lot of consumers don’t realize this or understand why everything is backordered so let me explain. Many businesses and industries were hurt by draconian and unconstitutional COVID-19 mandates. When businesses were forced to shut down last spring, products didn’t get made. When they were allowed to re-open, they usually had to do so with fewer staff with reduced output. When people were forced to stay home, consumer electronics manufacturers assumed the economy would tank and consumer demand would be zilch. Fortunately for our business and our industry they were wrong.
Many consumers were able to retain their livelihoods by working remotely. Unable to go out to eat or go on vacation, they suddenly had extra time and money on their hands. This disposable income shifted from the hospitality industry into other sectors like automotive, consumer electronics and home improvement. The biggest problem that all of these industries faced (and are still facing) is lack of product. Raw materials have become hard to source and products are often getting held up at the ports in LA.
To add insult to injury, the main semiconductor supplier in our industry – AKM in Japan – experienced a devastating fire last Fall. I find the whole thing bizarre and suspicious as there really aren’t a lot of details about the incident available and still no details on the cause of the blaze. The fire broke out at their Nobuoka semiconductor plant October 21, 2020 and burned for 82 hours. Rebuilding this facility is expected to take a year. As if that wasn’t weird enough, there was another fire just recently at a different semiconductor facility in Japan. But wait! There’s more. To top it off, another semiconductor supplier to our industry based in Texas had to shut down recently due to the deep freeze. The semiconductor shortage means consumers will see product shortages not only for things like car stereos, but also for new vehicles, cell phones and all sorts of consumer electronics. Manufacturers and vendors are already rationing out products to their dealers. Perhaps this is what war time rationing looks like in the 21st century. Hey look at the bright side – at least we’re just rationing consumer electronics and not food, right?
So unlike my typical blog post where I break down all the various options and models on the market for the year, I am going to write about models that I know are currently available or coming soon. The best Apple CarPlay Android Auto head unit 2021 may just be the one you can find in stock. Let’s break it down.
What does iDatalink Maestro compatible mean?
This Best Apple CarPlay Android Auto Head Unit 2021 blog post is going to be broken down into two double head unit categories: Non-Maestro compatible and Maestro compatible double din. If time allows, I will write a separate post dedicated to floating style screen models as this is a new and growing category.
I have explained this in previous posts, but for anyone unfamiliar with the iDatalink Maestro, let me recap. In many newer vehicles, like a 2016 Toyota Highlander for example, the stock stereo is basically part of the network in the car. When you remove the stock head unit in a car like this, you are basically breaking the network. You need to have the right parts to retain the flow of information or you may wind up with various features in your vehicle no longer operational.
In this particular vehicle, the iDatalink Maestro will retain:
Steering wheel controls
OEM reverse camera
JBL amp if equipped (which has a digital turn on)
Secondary vehicle information display
Access to vehicle settings
If I use a non Maestro compatible radio in this vehicle, the client will no longer have access the vehicle settings menu which is how you can change various options in the car related to door locks, turning on/off the notification beep when locking, etc. Additionally they would lose their secondary information display above the stock radio. I don’t know about you, but I can tell you most of my clients don’t like to lose features when “upgrading”. If you fall into that category, be sure to look up your vehicle info on maestro.idatalink.com.
If you have a vehicle that doesn’t need the iDatalink Maestro, you can still use a Maestro compatible radio, you just won’t benefit from any of the Maestro features. Things like vehicle info, tire pressure monitoring, battery voltage, track pack gauges, HVAC display, etc. are all vehicle dependent features and may not be applicable to your vehicle.
Non-Maestro Double Din Models:
Kenwood DMX4707s/DMX47s
Sony XAV-AX1000
Alpine iLX-W650
Kenwood DDX5707s/DDX57s
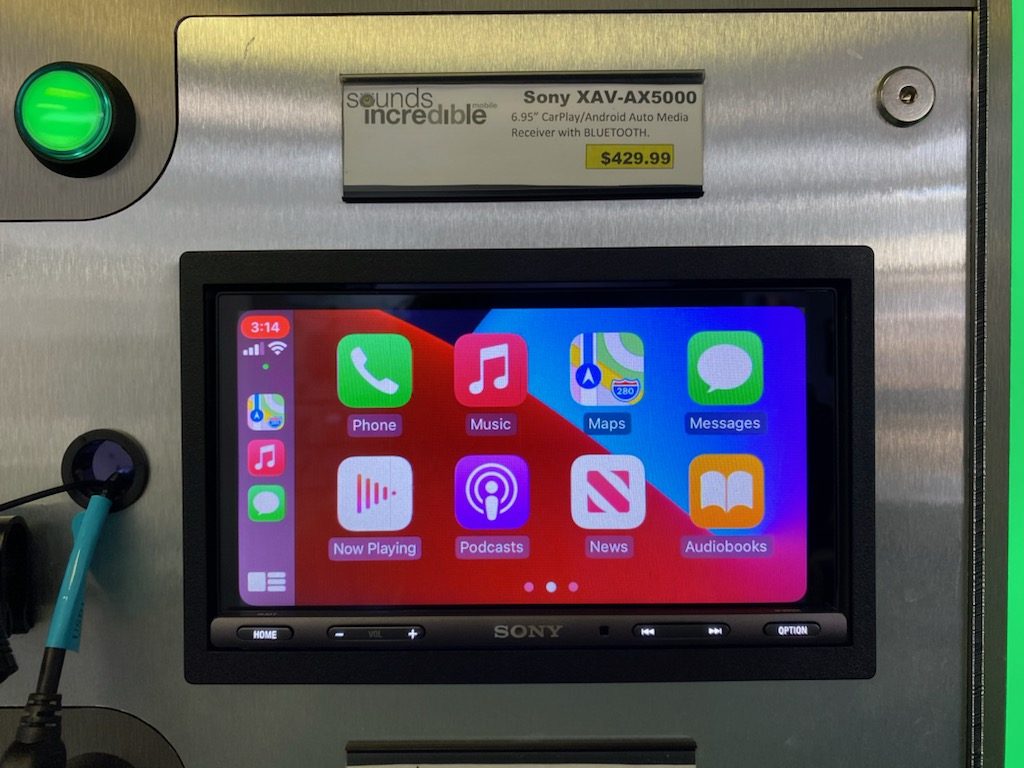
Sony XAV-AX5000
Sony XAV-AX7000
Maestro Double Din Models:
iLX-407
iLX-207
DMX907s
DDX9707s
DDX9907XR
Non Maestro Apple CarPlay Android Auto Models 2021
One of our best value Apple CarPlay stereos is the Sony XAV-AX1000. This mechless AM/FM Radio is the only double din Apple CarPlay model available with a volume knob, although it is a pretty small knob. You may notice this model has the USB input right on the front of the radio. This helps to cut down on installation related costs because there is no separate USB pigtail that needs to be flushed in anywhere. It’s extremely easy to use, nice large icons. However, you can’t really personalize or rearrange these icons. You can choose from several different background colors, but you cannot upload your own background image or splash screen.
Best Apple CarPlay Stereo 2021 – Sony XAV-AX1000 home screen
Priced at just $299.99, this is a great value for anyone looking for a basic, easy to use, CarPlay stereo without a lot of bells and whistles that will be an easy, straight forward install. Features include:
Resistive touch screen 6.4″
Bluetooth
Wired Apple CarPlay(no Android Auto)
AM/FM Radio
SiriusXM Ready (SXV300 tuner required)
Front, rear and subwoofer pre-amp output (2 volt)
Built in crossovers
10 Band EQ
Multicolor background display
Front USB
Front AUX input
Reverse camera input
One thing to note about the Sony XAV-AX1000 is that it is CarPlay compatible only. It is not Android Auto compatible. If you need a radio that is also Android Auto compatible, but at a great price, check out the Kenwood DMX4707s aka DMX47s.
Best Apple CarPlay Android Auto Head Unit 2021 – Kenwood DMX4707s aka DMX47s
Also priced at $299.99, this mechless CarPlay/Android Auto radio features a responsive glass capacitive touch screen. In addition, there is a few more customization controls on this model. You can easily re-arrange the source icons so the ones you use most always show up on the home screen. Additionally, there are several displays to pick from or you can upload your own image using a thumb drive. Features include:
Glass Capacitive touch screen 6.8″
Bluetooth
Wired Apple CarPlay and Android Auto
AM/FM Radio
SiriusXM Ready (SXV300 tuner required)
Front, rear and mono subwoofer pre-amp output (2 volt)
Built in crossovers
13 Band EQ
Various background display(or upload your own)
Rear USB
Rear A/V input (requires 3.5 A/V adapter)
Reverse camera input
Like the Sony XAV-AX1000, the DMX4707s and DMX47s lack a CD player. If you’re not quite ready to give you up your CD’s just yet, check out the Kenwood DDX5707s aka DDX57s. For just $70 more you can have all the features of the DMX4707s or DDX47s plus the added benefit of a CD player.
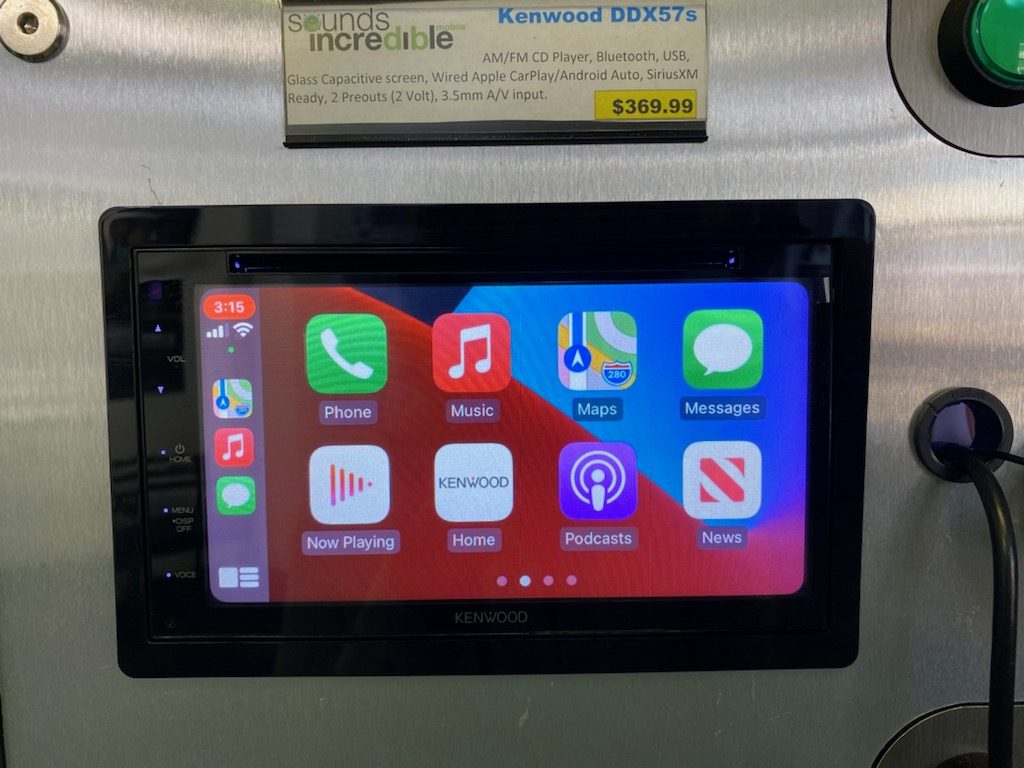
Best Apple CarPlay Android Auto Head Unit 2021 – Kenwood DDX5707s aka DDX57s
With the sleak piano black finish, I will say these Kenwoods are sharp looking radios in VW’s and Subaru WRX’s when paired with the proper piano black finish dash kit. If you like that finish for your car, but need Maestro compatibility, consider the Kenwood eXcelon DMX907s or DDX9907XR.
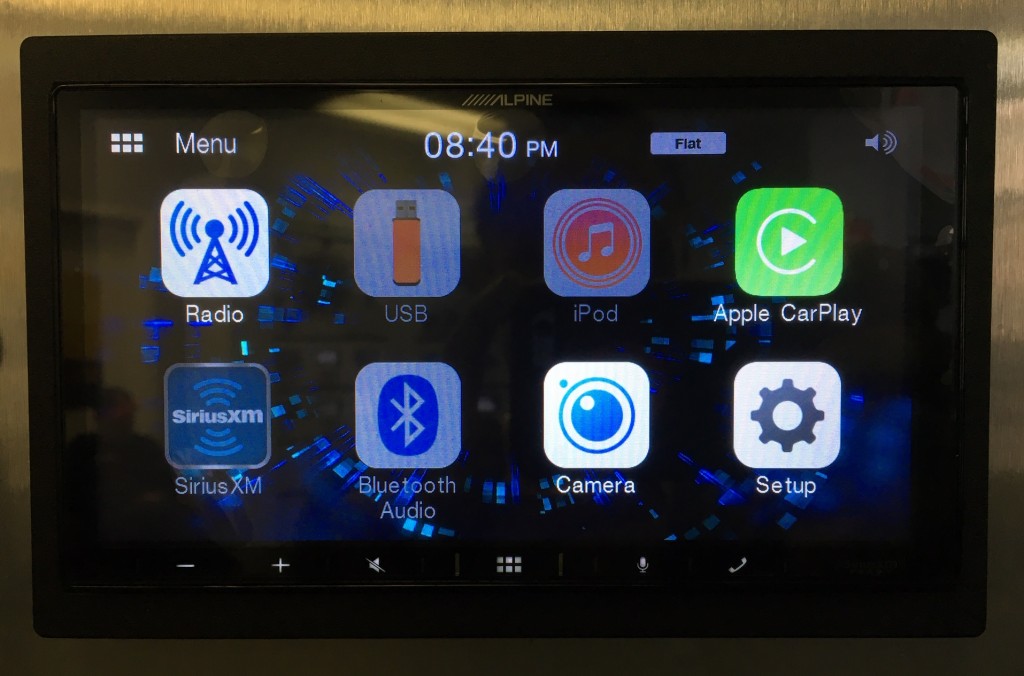
The most popular Android Auto/Apple CarPlay compatible radio at our shop has been the Alpine iLX-W650. This model is extremely hard to get right now. Shortly after the fire at AKM, Alpine announced they would no longer be accepting new orders for this model. Thankfully they have been focused on fulfilling all outstanding backorders. Expect to see this model phased out over the next couple months until the newer, and slightly more expensive Maestro compatible iLX-407 hits the market.
Alpine iLX-W650 – Home screen pic
If you can manage to snag one of these, it’s a great value, feature packed head unit. Aside from all the standard features, the iLX-W650 has a few unique features. Standard features include:
Glass Capacitive touch screen 7″
Bluetooth
Wired Apple CarPlay/Android Auto
AM/FM Radio
SiriusXM Ready (SXV300 tuner required)
Front, rear and subwoofer pre-amp output (4 volt)
Built in crossovers
9 Band Parametric EQ plus easy EQ (Bass – Mid – Treble)
Digital time alignment
Rear USB
Reverse camera input
Secondary camera input
Power pack ready – either KTA-450 or KTA-200M
Alpine iLX-W650 – Shallow Mount Design
Because of the mechless design, Alpine created a super shallow chassis and made a complementary series of amplifiers that can bolt right to the back of this head unit. This cuts down on installation time and parts tremendously. Choose from a compact high powered 4 channel amp, the KTA-450 boasting 50 watts x 4 RMS or add their new mini mono amp KTA-200M to send 200 watts RMS to your sub. This clever product design has saved our clients hundreds of dollars in parts and labor costs. You can easily create a value packed kick ass sound system using this head unit and complementing power pack amp.
If you like the idea of a capacitive touch screen for its vibrant and saturated color, but you have concerns about glare, check out the Sony XAV-AX5000. Check out how vibrant that screen looks compared to the Kenwood DDX57s above. They are mounted right next to each other on our showroom display and I took these photos one right after the next. Although they both use a capacitive touch screen, the Sony does not have a glass finish so it’s less likely to have glare on the surface.
Best Apple CarPlay Android Auto Head Unit 2021 – Sony XAV-AX5000
Unlike the Kenwood and Alpine models already discussed, this model also features a row on hard buttons on the bottom of the screen. Although the Kenwood and Alpine are very clean, sleek and minimalist in appearance due to the lack of hard buttons, touch controls might not be the easiest thing to use while you’re driving. If you have to take your eyes off the road and look down at the road to change tracks or volume, it might be a better idea to have a row of hard buttons that you can feel your way around and access without having to take your eyes off the road. If your car has steering wheel controls, this probably won’t matter anyways, but a design feature worth pointing out for consumers without steering wheel controls. Standard features include:
Anti-glare Capacitive touch screen 7″
Bluetooth
Wired Apple CarPlay and Android Auto
AM/FM Radio
SiriusXM Ready (SXV300 tuner required)
Front, rear and mono subwoofer pre-amp output (2 volt)
Built in crossovers
10 Band EQ
Various background display(or upload your own)
Dual Rear USB
Rear AUX input
Reverse camera input
Secondary camera input
If you like the idea of the Alpine power pack amps, but prefer the anti-glare touch screen and hard buttons of Sony, consider the Sony XAV-AX7000 which adds a high powered built in amp boasting 50 watts x 4 RMS. Additionally, the XAV-AX7000 steps up the pre-amp voltage from 2 volt to 5 volt which is great if you plan on adding a secondary amp to power a subwoofer with your system.
Maestro Apple CarPlay Android Auto Models 2021
Once the iLX-407 becomes available, game over. I think that will be the best value, best selling Apple CarPlay/Android Auto head unit for 2021. It might also be the only new model we see shipped.
Best Apple CarPlay Android Auto Head Unit 2021 – Alpine iLX-407
The Alpine iLX-407 looks exactly like its predecessor the iLX-W650. The main features that have been added include iDatalink Maestro compatibility (thank you Alpine!) HDMI input and HD Radio. This radio is expected to sell for $399.99 and I have a feeling they will be going like hotcakes. If you can’t wait for this model to ship (there is currently no ETA due to the chip shortage) consider the Alpine iLX-207.
Alpine iLX-207 aka i207-WRA
The Alpine iLX-207 is a great sounding stereo with a super clean pre-amp signal. Aside from Maestro compatibility, it also features a 9 band parametric EQ, built-in crossovers, digital time alignment and all the great sound quality features Alpine users expect. Unlike the iLX-W650 or iLX-407, the iLX-207 features an easily identifiable row of hard buttons on the bottom lip of the stereo. The Alpine iLX-207 includes feature such as:
Anti-Glare Capacitive touch screen 7″
Bluetooth
Wired Apple CarPlay/Android Auto
HD AM/FM Radio
SiriusXM Ready (SXV300 tuner required)
Front, rear and subwoofer pre-amp output (4 volt)
Built in crossovers
9 Band Parametric EQ
Digital time alignment
Rear USB
HDMI input
Reverse camera input
Multi-color illumination
iDatalink Maestro compatible
What about Wireless Apple CarPlay and Android Auto?
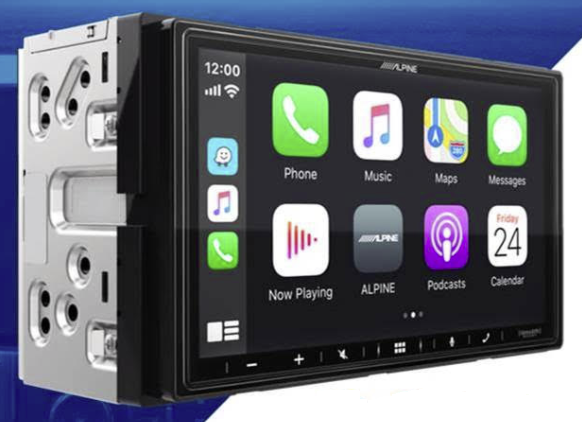
All of the models discussed so far feature a wired connection for Apple CarPlay and Android Auto. If you prefer a wireless connection, there are a few models available that offer it – that is, if you can find them. Each of these Kenwood models feature wireless connection for Apple CarPlay and Android Auto plus iDatalink Maestro compatibility starting with the Kenwood DMX907s.
Kenwood DMX907s – Wireless Apple CarPlay and Android Auto – no CD
The Kenwood DMX907s is part of Kenwood’s premium eXcelon series models which carries a 2 year warranty, uses gold plated RCA pre-amp outputs and features gold plated RCA pre-amp outputs. From a sound quality stand point, I really am partial to Kenwood. Don’t get me wrong, Alpine is great too. My husband has an Alpine Restyle unit in his Jeep and I have a Kenwood in my Jeep and both vehicles sound amazing. But when it comes to the sound quality control, Kenwood has a few more perks over Alpine.
One of those features I really like Kenwood calls Supreme. It’s not like a bass boost or restoration processor for compression. From an older Kenwood manual, it is described as “Technology to extrapolate and supplement with proprietary algorithm, the high-frequency range that is cut off when encoding. This function works on DVD MEDIA, USB, SD and iPod sources.” Whatever it is and however it works, I can tell you it always makes every car sound better. Additional audio control tools include a 13 band EQ with source dependent memory, digital time alignment, crossovers, speaker size and location effects, spatial effects and more.
I also really like that they use a Linux based system in the background and the cache is cleared every time you cycle the ignition. If my Kenwood ever has a rare technical hiccup like CarPlay locking up because I can’t remember the last time I restarted my phone, simply cycling the ignition always corrects the issue. The Kenwood DMX907s features:
Glass Capacitive touch screen 7″
Bluetooth
Wireless Apple CarPlay and Android Auto
HD AM/FM Radio
SiriusXM Ready (SXV300 tuner required)
Front, rear and subwoofer pre-amp outputs (5 volt gold plated)
Built in crossovers
13 Band EQ with source dependent memory
Additional sound control features such as Supreme, speaker size and spatial enhancement
Various background display(or upload your own)
Dual Rear USB
Rear A/V input (requires 3.5 A/V adapter)
3 camera inputs
iDatalink Maestro compatible
The Kenwood DMX907s does not have a CD player however. If you’re not ready to give up CD’s and you want wireless Apple CarPlay and Android Auto, you may want to consider the Kenwood DDX9707s.
Kenwood DDX9707s – Wireless Apple CarPlay and Android Auto with CD
Although this model is a step up in price because it adds the CD, it lacks HD Radio and the capacitive touch screen. However it does add one more camera input for a total for 4.
Kenwood DDX9907XR – High resolution screen
For the ultimate in high resolution display and features, check out the Kenwood eXcelon DDX9907XR. Although you wouldn’t know it from the stock image, this model has a much more vibrant and saturated picture quality thanks to the 2,764,800 pixel count which is substantially higher when compared to the standard 1,152,000 pixel count screens on the market.
High resolution anti-glare Glass Capacitive touch screen 7″
Bluetooth
Wireless Apple CarPlay and Android Auto
HD AM/FM Radio
CD player
SiriusXM Ready (SXV300 tuner required)
Front, rear and subwoofer pre-amp outputs (5 volt gold plated)
Built in crossovers
13 Band EQ with source dependent memory
Additional sound control features such as Supreme, speaker size and spatial enhancement
Various background display(or upload your own)
Dual Rear USB
Rear A/V input (requires 3.5 A/V adapter)
4 camera inputs including dedicated HD camera input for CMOS-740HD
iDatalink Maestro compatible
Why no Pioneer models?
You may have noticed I didn’t list any Pioneer models. I haven’t seen any Pioneer product available since August of 2020. My understanding is many of the aftermarket stereo manufacturers also have contracts with automakers and they have to fulfill those contracts before they can work on fulfilling orders for aftermarket products. Pioneer appears to be effected by this the most. The latest I heard from an industry insider is maybe we’ll begin to see Pioneer products available mid to late summer.
Conclusion
So what is the best Apple CarPlay Android Auto Head unit 2021? Truly it will be the one you can find in stock. Inventory is tighter than I have ever seen it my 21 years in the industry. It’s gotten to the point where I can’t even sell radios over the counter to customers anymore. We have to have discretion due to supply issues and what we do sell must come with professional installation only. Given the limited product availability, if 2021 is the year you want to upgrade to Apple CarPlay or Android Auto, you may have to compromise on features or spend more than you anticipated. The alternate option is to wait until next year when hopefully the semiconductor shortage has been addressed.
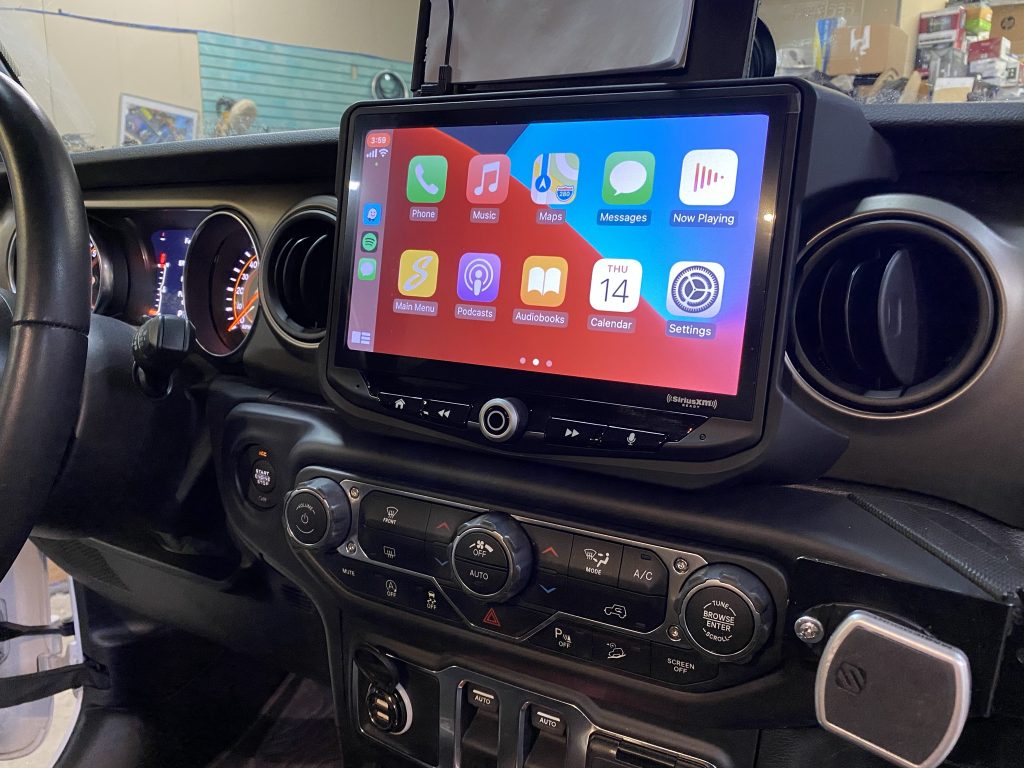
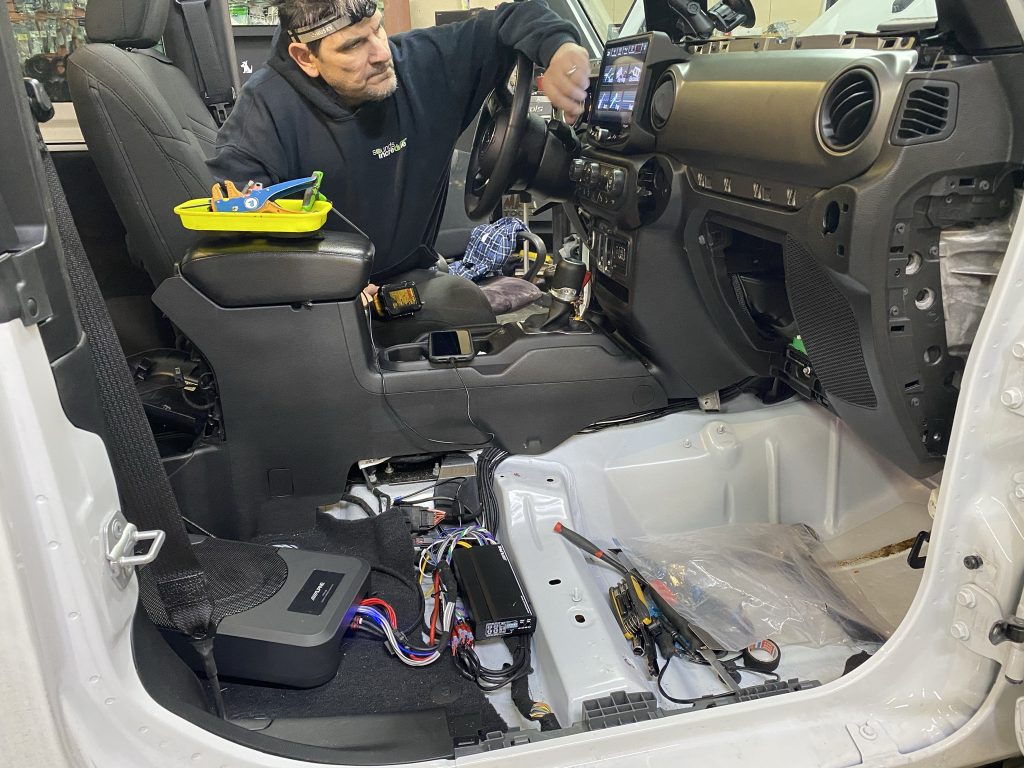
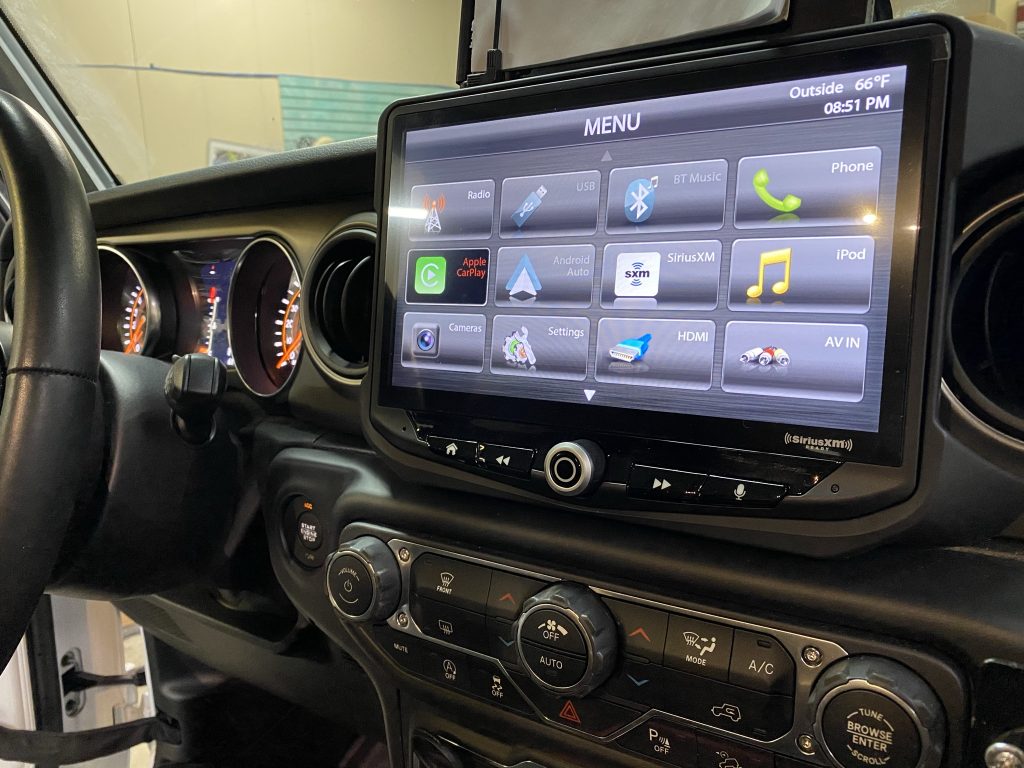
It seems like every other week at our shop, we have a Jeep in the garage getting a full stereo system upgrade. Recently, one of these upgrades involved the Stinger HEIGH10 Jeep stereo featuring a 10″ touch screen with Apple CarPlay and Android Auto.
Stinger HEIGH10 Jeep JL Review
The stock stereos in these vehicles are really quite awful which thankfully provides us some job security. For stereo upgrades in the Jeep Wrangler JL or Gladiator we are typically usually using the PAC Audio AP4-CH41R2 and interfacing with the stock head unit. This adapter conveniently provides a flat and clean front, rear and subwoofer RCA pre-amp connection so we can easily upgrade speakers and install aftermarket amps. It’s great for upgrading the sound in a Jeep while retaining the stock look and features.
What if you have the base stock 5″ radio and you want better sound quality and better technology like Apple CarPlay and Android Auto? Read on as I review the Stinger HEIGH10 Jeep Wrangler stereo UN1810 using the Wrangler JL/Gladiator install kit SRK-JW18EH.
Stinger HEIGH10 Jeep JL Review
The Stinger HEIGH10 radio has a ton of attractive features going for it, especially for Wrangler and Gladiator owners:
Vibrant 10″ touch screen 1024 x 600 with anti-glare technology
Apple CarPlay (wired to front dash USB input)
Android Auto (wired to front dash USB input)
SiriusXM capable (SXV300 tuner required)
Two USB inputs (secondary for iPod or USB)
HDMI input
4 Camera inputs
4 Volt front, rear and subwoofer pre-out
15 band EQ with time alignment
Toslink/Optical output
Floating screen – flush look
I was already familiar with the earlier iteration of this stereo, the Stinger ELEV8, and was aware of all its capabilities and features, but had always been hesitant to install one because truthfully – I’m just not a fan of the floating dash style radios. I do like the Alpine Halo series because of its more modest/minimalist appearance, but even then, I’ll only sell and install it in certain vehicles. There are some cars that these floating screens look great in and others where they just look really out of place and awkward.
Stinger HEIGH10 Jeep JL Review – Climate Display
Thankfully Stinger came out with a Wrangler specific install kit (SRK-JW18EH) that finishes this floating screen stereo out nicely.
Upgrading your stock Jeep JL Gladiator stereo
When it comes to replacing the stereo in Wrangler JL and Gladiators, there are a lot of things to be aware of.
Number one – it’s super tight behind the dash so you are really limited in options for aftermarket head units. Nothing with a traditional single din or double din chassis is going to fit.
Number two – there are a ton of features and vehicle info going through your stock stereo and very few aftermarket radios are capable of retaining all that stock functionality.
In fact as of this writing, two of our industry’s most popular aftermarket stereo parts manufacturers, iDatalink and Metra, still offer no solution to simply retain the OEM reverse camera. Metra actually made an aftermarket camera to go in the OEM location (what a pain in the ass!) and iDatalink is still working on a full kit solution for Maestro compatible radios (mechless and shallow mount only).
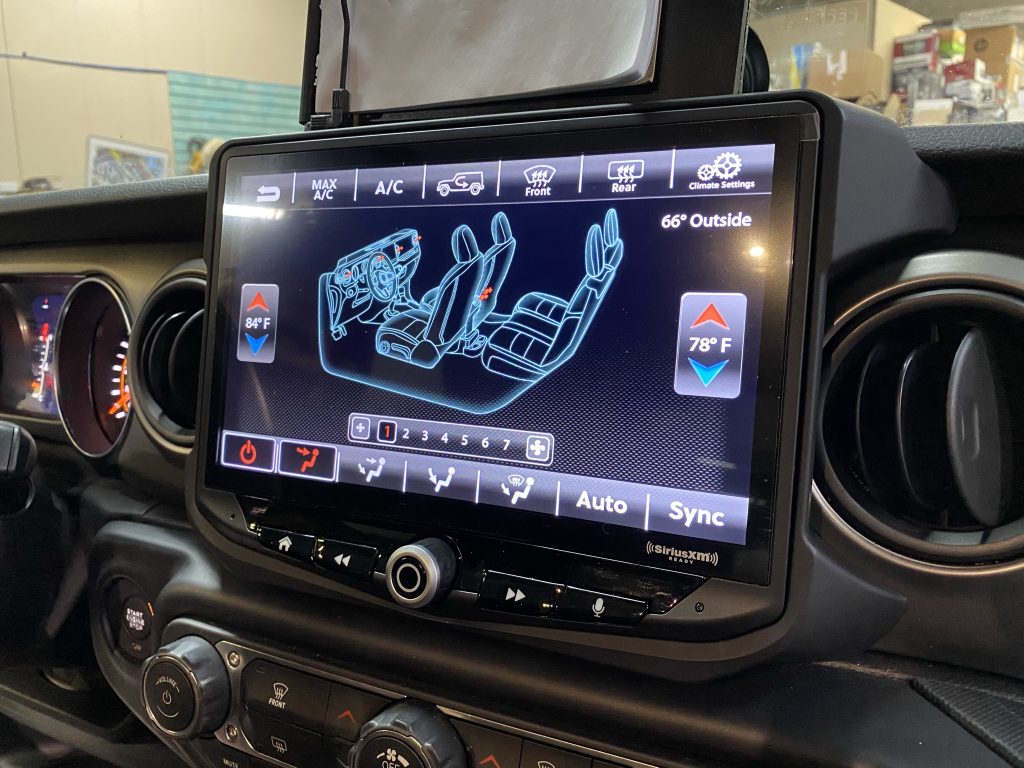
Stinger HEIGH10 – Retains OEM Features and Functions
Unlike many other major car stereo brands on the market, the Stinger HEIGH10 with the SRK-JW18EH Jeep installation kit has everything you need to wire up the radio and flush mount it in the dash.
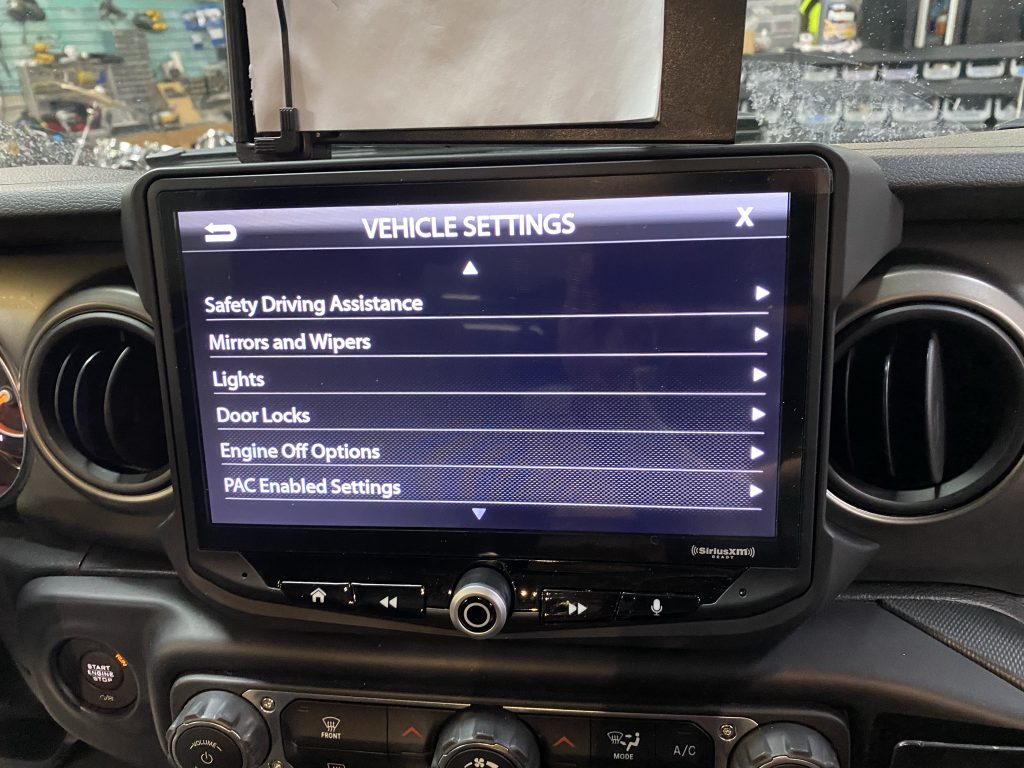
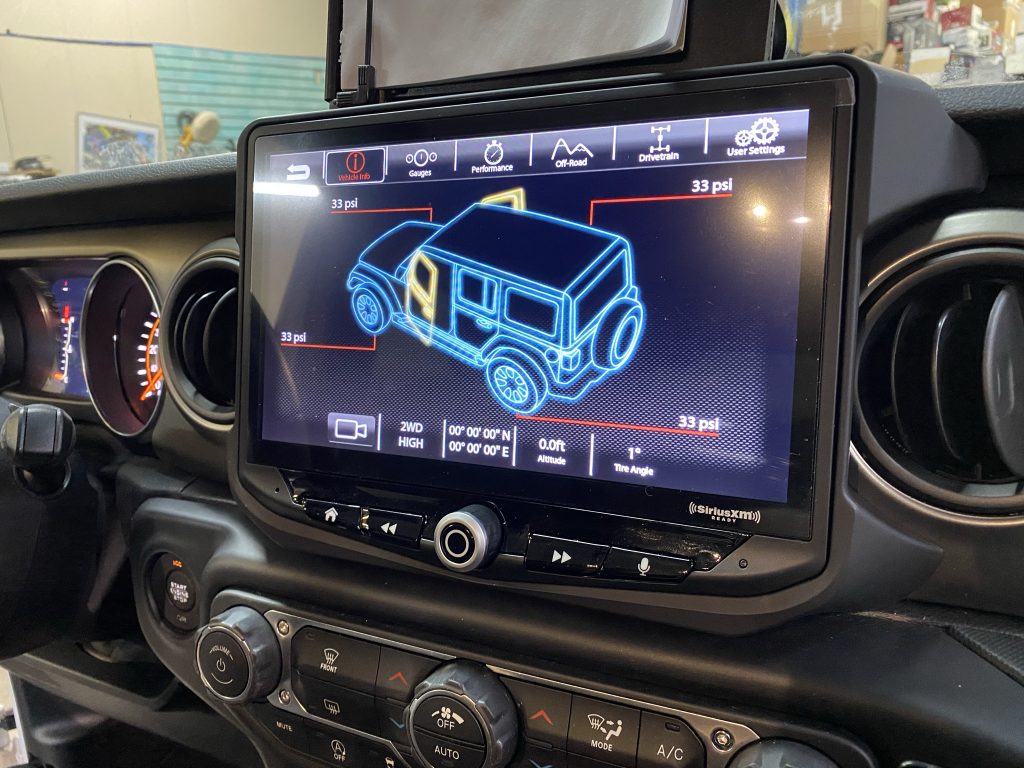
Stinger HEIGH10 Jeep JL Review – Vehicle settings menu
In addition to the clean finished look, check out the long list of features retained with this aftermarket Wrangler JL/Gladiator head unit:
Factory reverse camera (I think Stinger does this better than Alpine’s X409-WRA-JL does, but it was hard to tell on this install because the client had a hard spare tire cover with hole notched out which really limited the camera view so I couldn’t confirm this for certain)
Front camera if equipped
Original USB ports
Warning chimes
Steering wheel controls
Volume knob (if equipped with 7″ stock stereo)
Climate display
Access to vehicle settings in the radio
Stock amplifier if equipped
Stinger HEIGH10 – Bonus Features
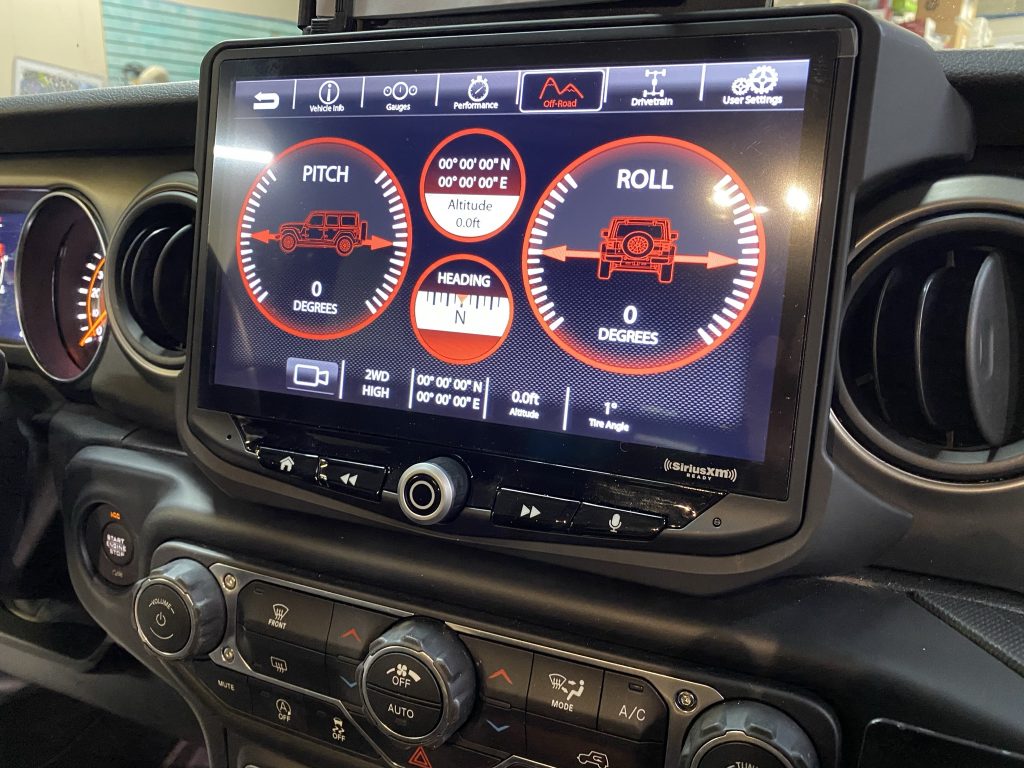
In addition to seamlessly retaining all these features, the Stinger HEIGH10 adds a ton of cool bonus vehicle information that would be helpful during off road excursions.
Stinger HEIGH10 Jeep JL Review – Pitch and Roll display
All of this vehicle information is easily accessible through the Stinger HEIGH10 radio when installed in a Jeep Wrangler JL or Gladiator:
Tire angle
Transfer case info
Tire pressure monitoring
Door status
Pitch & roll
Compass
Battery voltage
Coolant temperature
Transmission temperature
Oil pressure
Oil temperature
Intake air temperature
Outside temperature
Barometric pressure
Altitude
Longitude & Latitude
Stinger HEIGH10 Jeep JL Review – Door status and PSI display
Is all of this information necessary? No, but it certainly is cool and looks pretty on the screen. Overall, I think Stinger did a great job with graphics in general and as well as menu structure. It’s pretty intuitive to navigate the various options available and all of this info is very easy to find while traversing.
Disable Start/Stop Feature
One of my favorite minor features about this radio is the ability to disable the annoying Start/Stop technology. Check this box to enable memory of the automatic start/stop button on the dash.
I am the first to admit I am a tree hugger – I grew up with the whole “plant a tree, save the planet” indoctrination. My childhood family home is lined with huge evergreens that I brought home as little seedlings when I was a kid (am I the only one that remembers these free trees giveaways at school in the late 80’s?). But WTF – how much gas/emissions are you actually saving with this annoying embedded “feature”. Check this box in the Stinger HEIGH10 radio and plant another tree if you agree with me.
Stinger HEIGH10 – Best bang for your buck
As a fellow Jeep Wrangler owner (both a 2-door 2014 JK and 2019 JL) I understand how easy and tempting it is spend thousands of dollars on upgrades for our vehicles. Wheels, tires, lift kit, off-road upgrades, stereo upgrades etc. There is always a LOT we want to do to our Jeeps and budgeting for all the things we want to do can be tough.
If you own a Wrangler or Gladiator with the 5″ screen, it can be hard to justify spending $3k on the Alpine X409-WRA-JL or $2k on the Infotainment stock 8.4″ upgrade with updated climate control panel just to get a nice big screen with Apple CarPlay or Android Auto. This is where the Stinger HEIGH10 really shines in my opinion. It hits all the marks in terms of features for a quality aftermarket head unit upgrade while retaining all OEM functionality at a fraction of the cost of competitors.
Stinger HEIGH10 Jeep Review – Part of a full system upgrade
The Stinger HEIGH10 radio itself goes for $1099.95 and the Wrangler JL Gladiator install kit goes for $619.95 and it’s a great platform to work with. For someone on a budget looking for a full system upgrade, the money you save on this head unit can be put towards better quality speakers, amplifiers and subs which is exactly what this client did. We did a modest upgrade in this 2-door JL and it sounded great – WAY better than stock.
Stinger HEIGH10 Jeep Review – 15 Band EQ, DTA and Crossovers
Not only did this client get the benefit of the larger touch screen – the 15 band EQ (that’s 6 more bands than Alpine) with digital time alignment and 4 volt pre-amp gave us the tools necessary to make sure we were getting the best sound quality possible out of the components installed.
Stinger HEIGH10 Review Conclusion
It’s hard to find any fault with this product, Stinger thought of nearly everything. And for anyone who has been following my blog, you know I can always find fault with something. When pressed, I would say there was really only one hiccup that came up during our install. We realized the USB input for Apple CarPlay/Android Auto is the center console USB only. You cannot make this connection using the dash mounted USB. And the connection is wired only (not wireless). Additionally, the optional iGo Primo navigation SD card? It does not include off road maps. Overall, these seem like pretty minor drawbacks when you look at the total package and total price tag.
Lastly, I have heard from one reader that he experienced a sound quality degradation when interfacing this head unit with his stock Alpine system. To be clear – he only upgraded the head unit and nothing else and I have not been able to verify this personally. I suspect it may be a level matching issue between the stock amp and the Stinger head unit amp (which can happen in any car audio system when upgrading an in dash unit in a vehicle with a stock premium amplified system because you’re technically amplifying an already amplified signal). Even then, that issue could potentially be mitigated using the built-in audio controls. Stinger does offer very specific instruction in the advanced menu for the stock amplified settings. Perhaps those were not followed? I’m not sure, I’m still waiting to hear back from that reader to confirm.
Stinger HEIGH10 Jeep Review – Great features, functionality and value
In conclusion, the Stinger HEIGH10 stereo with Wrangler JL Gladiator kit is a fantastic choice for Jeep clients looking for an upgraded head unit without the $3k Alpine price tag. Have you installed the HEIGH10 in your Jeep? Let me know what you think of it in the comments below.